
Fishing kayaks: selection, fish finder installation and original battery-box project
Original publication: 2021-04-30.
Original image credits are retained. Image-use permission was confirmed by the site owner.
Fishing kayaks are new trend - and a great one above all. They fit perfectly in the area between belly boat and fishing boat. There is hardly any other watercraft for us anglers that is as flexible and versatile for all types of fishing as a fishing kayak. In this article we have put together the most important information about
- the construction,
- the propulsion system,
- the equipment
- as wells as the best accessories
of fishing kayaks. It should help you to inform yourself fundamentally and find a tailor-made solution in an unmanageable market offer, if the passion for this fishing variant has gripped you.
Table of contents:
- What is the best fishing kayak?
- What does convert a kayak into a fishing kayak?
- Sitting on top instead of in the middle
- Width before speed - why is that?
- Boat weight and payload: How much is possible?
- Drive types: Are you still paddling or are you already pedaling?
- Transport-optimized kayak types: What are the possibilities?
- Equipment and accessories: How to set up (outfit) a kayak for fishing?
- Two examples of good fishing kayaks.
- How to choose the perfect fishing kayak?
- How to rig your kayak for fishing: Fish finder and co. - what is the best fit?
- How to build a DIY waterproof power supply for your fishing kayak.
1. What is the best fishing kayak?
1.1.What does convert a kayak into a fishing kayak?
The sport of kayaking has a long tradition. Whether in whitewater, for water hiking or simply for various leisure activities on the water - the kayak has proven itself not only as sports equipment but also as a means of transportation. Depending on the intended use, it has been varied in its design and adapted in its focus to the applications.
Narrow, sleek and fast for sports, more tilt-resistant and robust for other purposes. Suitable design adjustments have also been made for the fishing and diving sectors to offer anglers a watercraft tailored to their needs. The biggest differences between a normal kayak and a fishing kayak are:
- Dimensions: Fishing kayaks are wider.
- Increased stability: Due to a flat hull.
- More storage capacity: For additional gear and equipment.
- Sit-on-top deck design: More space for you to move and place your gear.
- Propulsion system: Paddle, pedals or trolling engine.
- Comfortable seat: To enjoy every single hour of your fishing trip.
- Colors: That blend in with the environment.
- Extras: You can equip your fishing kayak with everything you need to get the most out of your angling trip.
1.1.1. What are the advantages of a fishing kayak?
A kayak can be easily transported on the roof of a car, handled by a single person and stored at home to save space. Neither a boat trailer nor an extra storage space is necessary. A suitable wall bracket in the garage, for example, is more than sufficient.
On the water, a fishing kayak shows off its maneuverability, is compact in size and gets the angler quickly from one hotspot to another - even over longer distances. Furthermore it is inherently robust and easy to maintain, as well as this mode of transport is environmentally friendly, flexible and sporty.
It is important to know, however, that any sports equipment should always be safely controlled. This is especially true for a fishing kayak - as well as during the transport as on the water. This starts with the safe transport from and to the water, continues with the correct paddling technique and ends with the compliance of all handling and safety precautions in practical use.
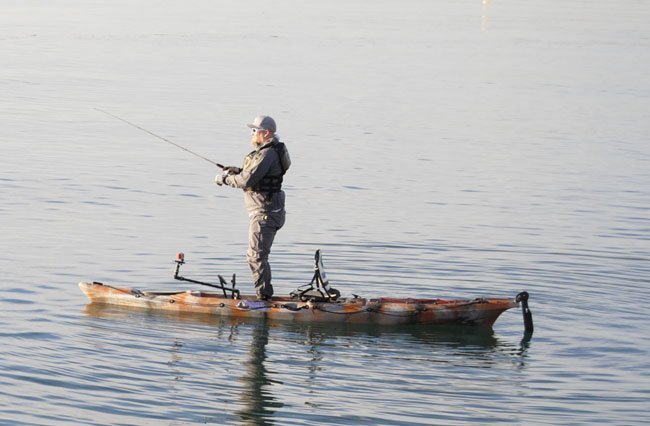
1.1.2. What to look for in a fishing kayak?
So how do you find the perfect fishing kayak in an unmanageable market offer? For this purpose, a number of considerations and decisions are recommended before buying such a boat - as we are going to explain in the course of this article. We will also discuss recommended kayak models for the sport fishing market - which are also a good representation of all the important decision criteria. This is NOT a practical test, but exactly how you can recognize and judge advantages and disadvantages of a such a vehicle in "dry condition".
Last but not least, we also highlight recommendations for sonar equipment (as well as its mounting) for a fishing kayak in detail. As a small add-on, we'll furthermore show you how to protect your power supply for the fish finder from moisture on any kayak. Firstly, however, we want to point out the design and equipment criteria to look for in a fishing kayak.
1.2. Sitting on top instead of in the middle?
Not only since the successful TV-series "Pacific Warriors", which shows kayak fishing in front of the picturesque setting of Hawaii, we know this boat type is characterized by a special design. The so called "sit-on-top" models have been optimized for fishing and diving - among other things.
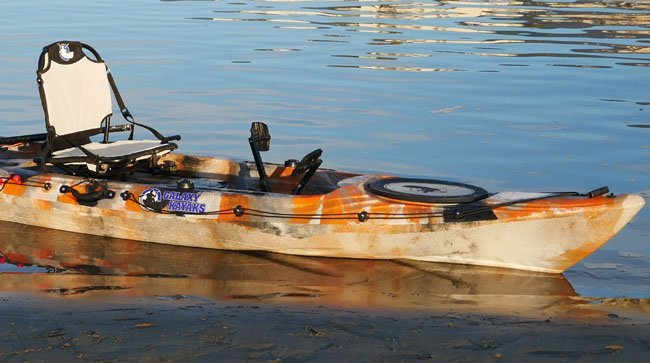
SIT-ON-TOP refers to types of kayaks where the user sits ON the vehicle in a small trough. The vehicle seat is therefore above the waterline and allows the angler a good overview of his area of operation. The
- closed,
- flat,
- one-piece
hull filled with air chambers
- is extremely robust,
- practically unsinkable
- and can handle high payloads
due to its buoyant shell. With an extremely stable floating position (depending on the width), you not only always have a safe feeling on the water despite the high seating position, but also (always depending on the design), you can also fish from a standing position.
In the event of capsizing, you are immediately released, so you do not have to free yourself as it is sometimes feared with whitewater models, where the driver is accommodated with the complete lower body inside the kayak. By the way, reboarding a sit-on-top model after watering is also much easier than with the usual "sit-in" kayaks..
The typical hull shape of a sit-on-top model has even more advantages for us anglers. Rod holders, fish finders, anchor, action cam, etc. can be easily mounted on the top of the hull. Storage compartments are available and easily accessible from the sitting position. It is easy for the manufacturer to equip the kayak with the desired accessories. Already in the basic configuration even a battery box and power cabling for everything electrical (including the drive) is feasible as delivered.
In practice, the upper deck remains free of water. Sit-on-top models are self-draining. A series of drainage holes in the float automatically drain off the water, if you remove the plugs that seal these.
1.3. Width before speed, why that ?
Sport kayaks are narrow and sleekly designed to allow fast and effortless progress. Unfortunately, this design principally comes at the expense of stability. Vehicles of this type are not very stable against tilting, a circumstance that is desirable for the sportsman, but which you as an angler do not need at all. Who wants to go swimming in full gear while drilling in a big pike.
A fishing kayak is therefore wider than its sporting cousins and is also designed for stability in terms of its hull - without restricting speedy progress too much. How well this compromise is achieved in one model or another ultimately determines how satisfied the user practically is in the long term. Experience has shown that higher-priced models also perform better in this aspect. At the retailer, by the way, you can check how well the boat can still be moved with the paddle as a simple test for its set-up.
The wider the kayak, the less suitable the paddle is as a drive option. Even if an alternative is available (e.g. pedal drive), you should not go fishing without a paddle in reserve in order to be prepared for any technical defects that may occur. Therefore a fishing kayak has to meet both criteria: It has to wide enough to be sufficiently stable on one hand - and narrow enough on the other for the alternative and problem-free use of the paddle. On average, this fits with widths around 80-85 cm.
1.4. Boat weight and payload, how much is possible?
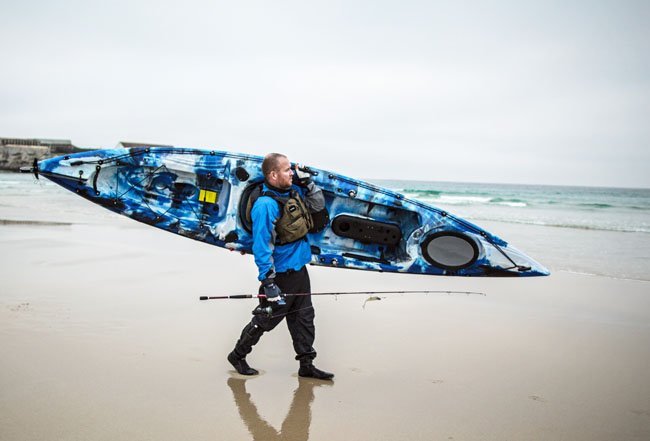
Car roofs are higher than you maybe think. If it is a SUV, it can get quite interesting when loading and unloading a kayak. For this purpose it makes a difference whether it weighs 22 lbs more or less - not to mention when it comes to carrying it from the car to the shore.
Depending on the equipment and length, fishing kayaks can weigh up to 110 lbs, which is hardly manageable for a one-man operation. Therefore, the boat weight is already a decisive criterion in the selection. It is well worth looking in a higher price range, as you are more likely to find what you are looking for there.
The models of highest quality in the 3.50 m class can weigh less than 66 lbs, the larger 4 m types should still remain well under 88 lbs. Boats between 66 lbs and 88 lbs you can actually still manage well alone with the help of a rolling aid.
Do not underestimate the possible load of a fishing kayak. Let's do a simple calculation: With a body weight of a strong angler (220 lbs), a pedal drive with 22 lbs and equipment of about 55 lbs, one or the other model is already overloaded. All models with up to 286 lbs payload, which are not a few, are already left out in this case.
Especially as you should have an assumed safety reserve of 25 %. In our model calculation, we then end up with a weight capacity of around 363 lbs. The best fishing kayak models though have a capacity of around 440 - 510 lbs - which should be sufficient in all cases, even for heavyweights.
1.5. Drive types: Are you still paddling or are you already pedaling?
The kayak is usually a paddle boat. A paddle as mode of driving ensures
- straight running,
- rapid progress
- and with the right paddling technique facilitates maneuvering and stopping the boat.
With the right paddling rhythm, you can move along for hours without getting tired. So everything okay? Not quite! As an angler, you need to have both hands free for rod and reel. This means in case of an emergency: Your are unable to maneuver and cannot follow the fish in the drill for example. And although the solution to this problem is theoretically simple, its technical implementation is quite demanding. You "simply" relocate the drive unit to your leg area.
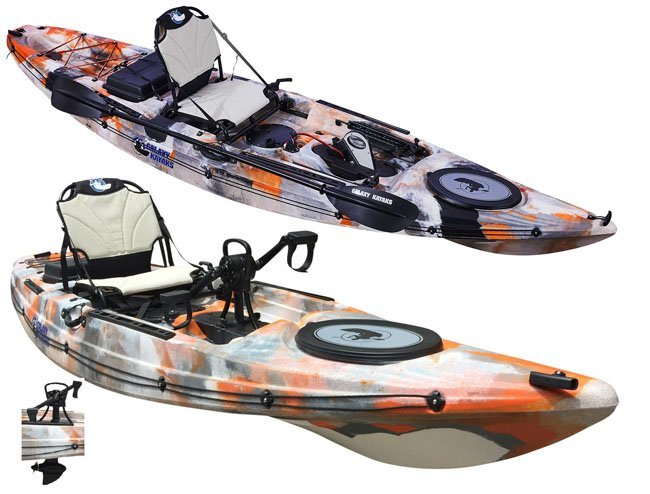
For that purpose you have to install a pedal unit in the boat (like with a bicycle), which drives a "propeller" under the boat. There also exist versions with rigid fins (the so called flipper drive) that are moved back and forth through the movements of the pedals.
The ingenious thing about this construction is that the complete unit with pedals and drive can be lowered down into the water through an opening in front of the seat and then lifted up again, when you get into shallower waters. With the drive unit in the leg area, you will also find a steering fin on the stern of the fishing kayak, which is operated manually. This is not only an excellent way to keep the kayak on course but also to move it in all directions - and even backwards when needed.
The lazy ones among us, however, can have electric drives installed on certain kayak models. Ideally, you simply replace the pedal drive with an electric version, that uses the same slot (insert). Otherwise, the motor must be attached to the side or stern with a suitable bracket, just like on a fishing boat. This makes things more than complicated and contradicts the kayak philosophy, which has simplicity and straightforwardness written all over it.
Another issue that inevitably comes along with an electric propulsion is the battery. It adds weight and must be short-circuit proof connected to all electric components. For a 44 lbs motor and medium-length tours, a 100 Ah battery is recommended to provide sufficient energy reserves. Weight-optimized lithium models of this type weigh around 26,5 lbs. With the motor unit, that's around 44 lbs of additional weight. If you want to use cheap lead-acid models, you will have to calculate about 66 lbs for the power supply unit alone. This is almost equal to the weight of the vehicle itself and should actually be self-denying.
1.6. Transport-optimized kayak types: What are the possibilities?
Those who do not want to transport their fishing kayak on the roof of their car have the option of using transport-optimized models. Both types mentioned here fit into a large trunk, but have design-related disadvantages.
First of all you could consider an inflatable kayak. One of these is inflated and ready for use in just a few minutes. On the water they are usually driven by a paddle. Their susceptibility to damage nevertheless is well known. From a technical point of view, we have an inflatable boat with
- poor directional stability,
- high susceptibility to wind
- and slow movement.
And, attaching accessories to the tubes is a challenge in itself anyway.
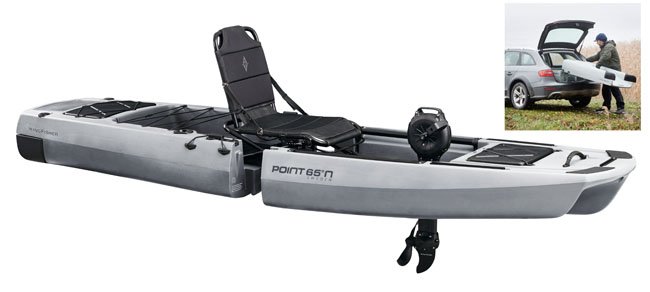
The second option you can consider is a modular kayak. Modular means that the kayak consists of two or more parts, which are joined together on the water and then form a full-fledged fishing kayak. For transport purposes they fit without problems in a van or a rear-door truck with the rear seat folded down.
This is just as advantageous for transport as for storage, for which a cellar corner is sufficient. You can also easily carry the parts one by one to the water. Pedal drive options are of course available, so what's the catch?
Well, it's hidden in the maximum attainable payload. Even larger models, which are otherwise little inferior to the one-piece fishing kayak, rarely get beyond 290 lbs. That may be enough for the lightweight fisherman, but but for grown men with 220 lbs it will get tight.
1.7. Equipment and accessories: How to set up (outfit) a kayak for fishing?
The equipment of a fishing kayak is the real individualization of the vehicle. Here, each and everyone can satisfy their needs for accessories and movable equipment, having chosen a particular model of kayak. With the selection of the boat type itself, certain parameters obviously are already fixed. This applies to
- the open and closed storage compartments,
- the rails for the accessory holders
- as well as a very important detail - the seat.
Hopefully you will take a close look at the last point. On the one hand in terms of its adjustment possibilities - e.g. the longitudinal adjustment, which is crucial for the distance to the pedal drive. Or on the other hand its seating comfort. For longer tours and a relaxed fishing this is essential. Speaking of rails: These usually are able to hold so-called starports, which are small round islands that can be used flexibly on the rails.
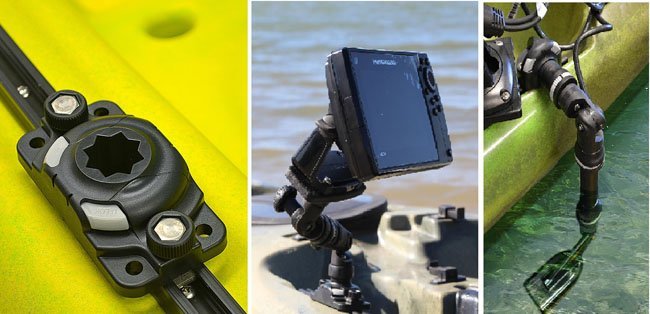
They accommodate the appropriate accessories such as fishing rod holders, fish finder mounts, action cam or flag sticks. Here, the user has few limits if he does not exceed the maximum number of starports. In order to keep the total costs under control, it is naturally helpful if the manufacturer has basic needs already on and built into the basic equipment.
All desirable extensions to the basic equipment should furthermore be available from the same supplier, so that you can resolve your complete equipping process in one go. Last but not least to get an idea of the total costs before ordering. Possibly you can still negotiate the total price with the dealer.
Apart from the boat and its equipment itself, do not forget about a life jacket and various safety lines (paddle, angler, boat sideways). Also, you need to think about a transport aid (cart) and possibly also a mounting aid for the rear window of your car - which is more than helpful for loading and unloading the kayak.
1.7.1. The most important selection criteria.
Let's summarize the findings so far in a short overview. A well-equiped fishing kayak should meet the following criteria:
- Sit-on-top model variant,
- One piece hard shell,
- Tilt stable but at the same time well paddleable,
- Boat weight < 90 lbs,
- Payload > 400 lbs,
- Pedal drive compatible (plus possibility for an e-motor),
- Adjustable comfort seat,
- Sufficient storage space (closed and open),
- Adequate basic equipment (incl. paddle),
- Wide range of additional accessories,
- Transport aids.
1.7.2 The costs: How much is a fishing kayak?
A good fishing kayak is available from around 1200 US$ (paddle only). With an additional pedal drive the entry price is about 1800 US$. If you are willing to invest more (to satisfy higher quality requirements), you can easily spend 3600 US$ - to start with - or even more.
These prices anyways refer to a standard model with a basic equipment - which in most of the cases has to be upgraded with the one or other accessory part. Here it is possible to be thrifty or to go all the way. Indispensable are
- roof racks,
- life jacket,
- transport cart
- and some mounting aids like starports, rod holders, etc.
How much you are going to spend in the end on accessories, depends mainly on your wishes and demands - as well as the equipment scope of your desired model. If you are just starting with kayak fishing and buy decent starter model in the 1800 US$ class, you should be able to get along with a total cost of 3000 US$ - if you take a rather frugal approach.
Not to be misunderstood: Of course you can buy a kayak for 600 US$, pack your paddle and fishing rod - and go angling. All associated disadvantages from the kayak type on the one hand (e.g. drive, stability, etc.) and the lack of accessories (e.g. no rails for mounting available) on the other hand, you can defy (or deny) and still be happy with your purchase. But everyone who seriously approaches kayak fishing must decide for himself whether this is necessary (and viable).
1.8. Two examples of good fishing kayaks
We now want to go through the quality features, equipment details and the in the previous chapter established criteria with the help of two exemplarily selected fishing kayaks.
- Model 1 - Galaxy Wahoo S HV: This is a well thought-out and quite high quality model. It is distributed by the company Galaxycommerce (www.de.galaxykyaks.eu).
- Model 2 - "SLAYER" PROPEL 10: Is a very compact model and belongs to the higher price and quality range. Europe-wide distribution: Fa. Element2 GmbH (element-2.de).
1.8.1. Galaxy Wahoo S HV with pedal or electric drive
This model does not only meet all the criteria we listed in chapter 1.7.1 - it is furthermore flexible in its choice of propulsion and can integrate virtually any equipment from the Railblaza program. With
- 11,8 ft length,
- 2,75 ft width
- and a payload of 396 lbs
it meets all the specifications of a compact fishing kayak. The keel-cut wide hull shape provides stability and a good straight line, while still being comfortable to paddle. With specially designed bow and stern areas, it cuts smoothly through the water. The slightly raised bow area optimizes rough water tolerance.
1.8.1.1. The Anvanti Pedal Drive
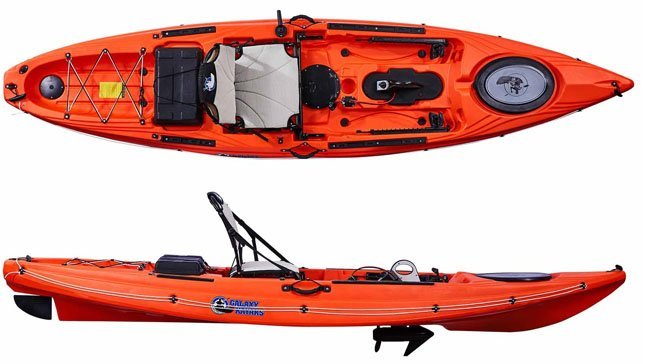
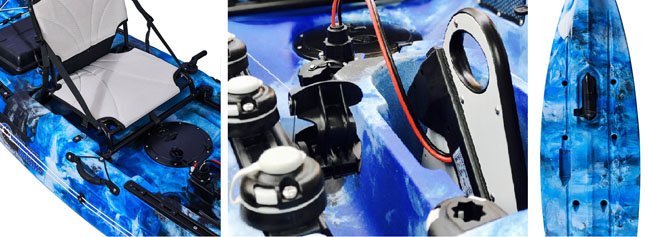
Ingeniously solved are the possible drive types in connection with the existing hand-controlled rudder system. The Avanti Pedal Drive (see illustration above) is a 17,2 lbs unit that resembles an outboard motor in its technical implementation, and not just visually. Practically, the "bicycle" drives a propeller in a ratio of 1:10 via a reversing gear - i.e. one turn of the crank turns the propeller 10 times.
The pedal drive fits into an opening in the center of the kayak so that the propeller unit can provide propulsion underneath the hull. In very shallow areas or when you are landing, you can lift it up with a handle. This can only be done with a two-bladed propeller blade, which is always in the deployed or retracted position at standstill.
In terms of drive ergonomics, not necessarily the optimal solution, but here we are already complaining at a high level. The important point is that the kayak can be moved quickly and easily, while the angler has both hands available.
1.8.1.2. The electric drive variant
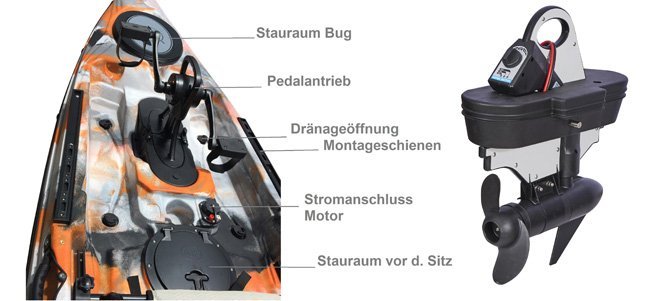
Alternatively, you can also drive the Galaxy Wahoo S HV electrically. We know: Other models also offer this. Here, however, the e-drive is not a rear-mounted electric motor but it fits exactly into the same mounting slot as the pedal drive. The pedals are simply replaced by an electric motor - simply ingenious. Congratulations: The developers have actually gone all the way with this drive variant.
Furthermore it features
- a closed battery compartment behind the seat,
- a pre-installed wiring
- and a connection socket for the power supply of the motor - which is also suitable to supply the fishfinder.
So, while being on the water, all you have to do is insert the motor unit and connect the plug to the socket - and you are ready to go.
What more could you ask for? The engine itself is a 44 lbs model with 5 forward and 2 reverse speeds. More power efficient, of course, would have been a continuous speed control. But that would have driven up the cost and might not have been as space efficient to implement - while here pedaling or comfortable electric driving costs the same money. You have to praise the manufacturer for this fair pricing model.
The pedal drive however is less complicated in practice, because it doesn´t depend on an energy source - which has to be transported, charged and installed. Die-hard kayak enthusiasts anyways will turn their faces away in disgust when they hear the word electric.
Nevertheless, one must acknowledge the advantages of motorization. Firstly the radius of action is wider. Secondly adversities such as wind, waves and currents are easier to control. Ultimately, the whole fishing experience benefits. There is no better way to adjust your trolling speed than with an electric motor - and the drill can also be enjoyed in a much more relaxed manner. This also applies to longer distances that have to be covered between the different hotspots.
For all those who can not decide: You can also buy both drives. At a price of 450 US$ per piece, this is certainly an option worth considering. Then you can easily decide between being lazy or training your body - as needed (or preferred).
1.8.1.3. Additional equipment
Let´s have a closer look at the the equipment of the Galaxy Wahoo S HV.
- Three closed storage compartments are available.
- We have already mentioned the battery box.
- There is a large hatch in the bow area and a smaller one directly in front of the seat. This is handy for storing utensils.
- Additionaly we find an open storage compartment for larger items in the stern area.
- For mounting accessories there exist four rails. Two large ones in the front and two smaller ones in the rear.
- The Galaxy Wahoo is equipped with a Vista High seat that allows for an elevated seating position. It runs on rails and is thus individually adjustable. Regarding its seating comfort, there are no complaints from the many user feedbacks. That speaks for itself.
- Moreover the offer of accessories from railblaza.com is extensive. With this wide selection every angler can rig his kayak individually. From the rod holder to the action cam and the fish finder to the flag pennant (towing flag), everything is possible - and available. As well as reasonably priced.
If you want to know more about the equipment options, take a look at the manufacturer's online catalog. Finally, a word about the transducer mounting of your fish finder. The Galaxy Wahhoo S HV has a mounting option provided on the underside of the hull. We are going to discuss this in detail in the sonar transducer section of this article. But that much can already be said: It actually can' t get much better than this.
1.8.1.4. Scope of delivery, price and conclusion
Included with the Galaxy Wahoo S HV are:
- 1 paddle 2-piece,
- 1 rod holder,
- 2 Starports mounting islands,
- 2 paddle clips,
- bungees to secure the load
- as well as holding and securing lines for the sides.
- Price: 1900 US$ (including pedal- or e-drive).
Conclusion: At a price of around 1900 US$ you get a good fishing kayak with flexible drive, a decent basic equipment and an optimal range of accessories. It is well thought out in many points and optimized for fishing. No expense was spared in the use of materials, finishing and design of useful equipment. The storage space is in accordance with the compact boat dimensions certainly not lush - but sufficient.
Some details of the 1,3 ft longer Galaxy Supernova HV - such as flush trolling rod holders - have not been realized in the Galaxy Wahoo, although it would have been feasible. What we do not like so much are the guide rails. The fish finder mounting is not easy to realize with them.
Either the fishfinder has to be placed in the paddling and fishing area - or in an outer area of the boat so that it doesn´t collide to collide with the pedals of the pedal drive. This could have been easily avoided with two small crossbars in front of the nose stowage as they are available on the Galaxy Supernova model. A more stable locking of the drive could also be considered.
The price-performance ratio of the Galaxy Wahoo S HV is overall great. Compared to the competition, you can easily spend twice as much without getting a real increase in value. From this summer on, the fishing kayaks of this supplier furthermore will be universally equipable with three drive options (pedal, flipper, e-motor). This expands the possibilities of the potential buyer. He is no longer limited to a certain type of kayak, if he wants to have all possible drive options to choose from.
1.8.2. Native Watercraft Slayer Propel 10
Back to the table of contents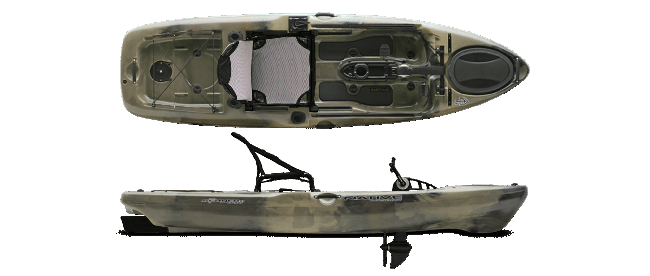
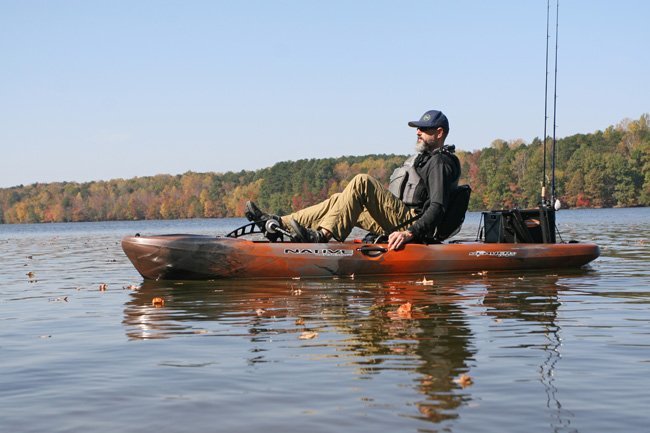
The Native Watercraft Slayer Propel 10 can be found in the upper price range. With pedal drive, the price is just under 2100 US$, which suggests an attractive quality product. In fact, the kayak is ultra-compact with a length of around 9,85 ft and a width of 2,82 ft and meets all our criteria. The shape as well as the design of the massive hull promise very high stability and massive buoyancy, which is reflected in a maximum payload of 500 lbs. Many sports enthusiasts who use this model confirm that they often fish and drill from a standing position, which speaks for the excellent stability of the hull.
Two features are the stars of the ensemble - but also explain the rather high pricing.
- Firstly: The seat is superbly engineered. Many users are particularly impressed by its seating comfort on longer turns and describe its use on the water as relaxed cruising.
- Secondly: The crank drive is cleverly designed in a number of aspects and constructed to a high standard of practicality and quality. Among many other details, its robustness, the smooth-running moving parts and the stable guidance of the drive via a skeleton arm (see picture above), which is attached to a rotating rod in front of the bow stowage are worth mentioning.
The highlight of the whole thing is that the entire drive can be easily folded up and stored in the front of the bow via the swivel device if required. With the screw upwards, the drive unit is then still securely fixed and does not lie around loose. This is an intelligent solution. Unfortunately, this quality does also has its price, which turns out to be more than three times as high as the drive of the Galaxy Wahoo with about 1500 US$.
What we further like are the three flush rod holders (two behind the seat, one on the side), which are part of the standard equipment. Other features such as non-slip pads in the foot area complete the perfect impression of this model. Another thing that remains to be mentioned is the easy handling of the kayak. With just 62 lbs net weight (without seat and drive), it is very easy to load and unload.
1.9. How to choose the perfect fishing kayak?
Your ideal fishing kayak can be quite different from the models we just presented here. This may be because you want to set your own priorities or because your price vision differs. However, in order to be able to assess your choice and make a final judgment, it is certainly not a mistake to use our criteria as a guide and draw comparisons with your favorites.
We have therefore created a table in which we have entered the features of the presented models (Galaxy Wahoo S HV and Native Mariner Slayer 10). All you have to do now is enter a model of your choice in the empty column, make direct comparisons, calculate the accessories and set the final price. After that, it's easy to estimate what you'll get for your money - and how well your choice will hold up next to our suggestions.
| Galaxy Wahoo S HV | Extra costs | Native Mariner Slayer Propel 10 | Extra costs | Own model | Extra costs | |
|---|---|---|---|---|---|---|
| Material usage | Hard shell PE in one piece | |||||
| Type | One-piece | One-piece | ||||
| Sit-on-Top | Yes | Yes | ||||
| Weight | 85 lbs | 82,7 lbsg / 61,7 lbs | ||||
| Max. payload | 400 lbs | 500,5 lbs | ||||
| Wide | 2,75 ft | 2,8 ft | ||||
| Length | 11,7 ft | 10 ft | ||||
| Paddle use | Yes | Yes | ||||
| Pedal drive | Possible | Possible | ||||
| E-drive | Possible | Yes, external | ||||
| Control system manual operation | Yes | Yes | ||||
| Comfort seat | Yes | Yes | ||||
| Adjustable | Yes | Yes | ||||
| Mounting rails | 4 pieces (2 each at front and stern) | 2 (front and center) | ||||
| Storage space closed | 1 in the bow area, 1 before the seat and 1 behind the seat | 1 in the bow area | ||||
| Storage space open | 1 in the stern | 1 in the stern | ||||
| Bungee fastening | Yes - in the back | Yes, in the back | ||||
| Battery compartment | Yes - behind the seat | No | ||||
| Transducer recess hull | Yes | No | ||||
| Cover for transducer recess | Yes | No | ||||
| Drain holes | 10 | 8 | ||||
| Sealing plug | Yes | Yes | ||||
| Supplied accessories in the basic equipment | Bungees, paddle two-piece, 2 Starports, 1 rod holder, 2 paddle clips | Bungees, 3 rod holders flush | ||||
| Available accessories | Complete Railblaza program www.railblaza.com | Complete Railblaza program | ||||
| Example costs for accessories | Accessories | 34 US$ | ||||
Rod holder (1 piece) | Accessories | 17 US$ | ||||
| Railmount | Accessories from | 42,5 US$ | ||||
| Transport trolley | Accessories from | 42,5 US$ | ||||
| Life jacket | 1900 US$ | |||||
| Basic cost kayak with pedal or e-drive | 2.100 US$ with pedal drive | |||||
| Total cost | Dependent on accessories | Dependent on accessories |
2. How to rig your kayak for fishing: Fish finder and co. - what is the best fit?
For the experienced angler, a fish finder (or rather a combination device with a chartplotter) is at the top of the list of accessories and equipment. In this chapter you are going to learn:
- Why such a device is advantageous for fishing with a kayak,
- what you should look for when purchasing
- and which models we recommended.
2.1. What fish finder screen size for a fishing kayak?
Handy fish finder models with 4 inch screens are often recommended for belly boats - which is quite reasonable. With these the viewing distance is within a close range, so the the visual capture of details should not be a problem. Echo sounders from this class are also sometimes offered for kayaks. In our opinion, however, this makes little sense, since the usual mounting location of the sonar unit should be in the forepart. Otherwise, all activities in the seating area (such as paddling and fishing), would be interfered with.
So the viewing distance to the fish finder on the kayak is quite a bit more than on the compact belly boat. This requires more screen size and resolution to clearly perceive all information from the device.
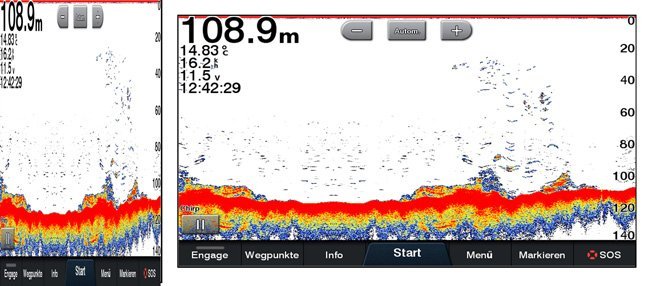
This is especially true, if you additionally use a chartplotter or nautical charts for navigation - or even simply for approaching known hotspots. Therefore we would strongly recommend at least a 5 inch (better still 7 inch) fish finder to rig your fishing kayak. There is also no real argument against a 9-inch variant. If you already own a device with this screen size, you do not have to worry about buying a new one; you only require the right mounting accessories.
2.2. Does a combo unit with plotter and sonar make sense?
Kayaks are not intended for use on the local carp pond, but are more suitable for larger waters up to the near coastal area. The wider the water to be navigated, the more important it gets to use a chart plotter with its navigation and water exploration capabilities.
- Knowing the underwater terrain,
- locating and approaching possible hotspots with pinpoint accuracy
are possibilities to improve your fishing efficiency that you should not ignore.
In this context, the ability of all commercially available plotters to use the fish finder to map unknown waters with depth contours or to revise existing water maps is also a very interesting feature. If you know what the bottom of the water around your boat looks like, you increase your chances of interpreting the fish finder images correctly.
For the fishfinder itself, there is absolutely no reason not to prefer models with three echo sounding techniques - if your petty cash allows it.
- With the classic 2D sonar, you explore the bottom contours as well as existing fish populations.
- In the DownScan method, you look directly under the boat and break down the basic formation in this area with high frequencies.
- With the sidescan view, you explore the areas to the left and right and obtain information about the exact fish position, which is missing in the other two methods.
In the 7 inch device class (or bigger) all models of the known manufacturers are well positioned in this regard. Differences in the performance of individual echo sounder methods from one or the other supplier can generally be neglected, so that one does not have to commit oneself in advance for a specific manufacturer.
2.3. How to attach the sonar transducer?
The question "Which transducer to use for a fish finder on a kayak?" requires a close look at its size and mounting location. The first decisive question is whether the fishfinder (including the transducer) should remain mobile - I.e. whether it will also be used on other occasions. And with other watercrafts. If this is the case, there is actually only one practical mounting option: On the accessory rail with a suitable bracket, preferably in the stern area to have it out of the way (your hands, the pedals of the drive etc.). If the transducer is to be used exclusively in the kayak, you have two other options in addition to the one just described.
The better one of the two depends on the kayak model: We are talking about a box-like recess in the hull, which serves exclusively for this mounting purpose. However, it already has to be present on the hardware side, which is by no means the case for all models. In this recess - which has a connection to the upper deck through an opening - the transducer is mounted, the cable runs through the existing channel up to the fish finder. The box can then be sealed with a water permeable cover that is flush with the hull. This mounting location is optimal, because:
- Firstly, because the transducer does not have to be remounted each time the boat is used, as it is permanently conected.
- Secondly, it is in direct contact with the water and does not protrude anywhere, so it cannot be damaged even if the boat touches the ground. This is also important for transporting the kayak to or from the water.
- Thirdly: The transducer position in the center provides the optimal scanning position for the fish finder. You always sit in the center of the sonar cone. This is advantageous for the interpretation of the sonar images.
- Fourthly: You also don't have any cable clutter on board with this attachment. Just as little an externally routed cable. Only a direct connection to the device. However, we should not conceal the fact that a suitable mounting plate may have to be purchased for the recess, as the supplied ones often are not suitable.
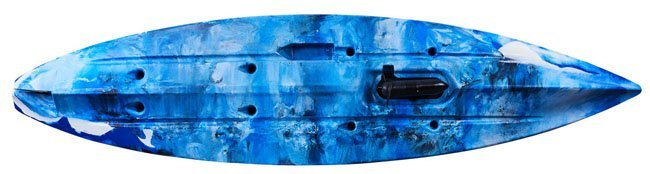
The last remaining mounting option for the transducer would be a low-lying stowage compartment into which it would be glued. The transducer signals then enter the water through the bottom of the vehicle. This was often recommended in the early years of kayak fishing.
At that time, it was common to use synthetic resin to attach the transducer, which resulted in an inseparable bond. Today, one would try it with silicone. The advantage of this installation is the protection of the transducer inside the hull. The disadvantage, however, is the possible signal deterioration, because of the lack of direct water contact and the need for the pings to pass through the base wall.
In summary: The easiest way to mount the transducer is via the accessory rail. Unfortunately, there the device is prone to damage and has to be reinstalled for each use. With the proper kayak, the mounting box in the hull is the best solution - but then you have to choose a suitable model. The inboard solution is the most safe and complex - but with the described disadvantages not the first choice for the mounting location of the transducer.
2.4. The best place to store the power supply?
A fish sonar needs a suitable power supply, if you do not use an electric drive, whose battery can also supply it. Tips for the right battery can be found in our extensive fish finder battery review. For the use with a fishing kayak a water-protected enclosure of the battery is the most important duty. This avoids possible short circuits. A covered storage compartment alone does not establish that a battery installation is protected from water or short circuits; assess the enclosure, wiring and protection for the actual installation.
If not, you should place the battery in a waterproof outdoor case. The connections on the case must be waterproof, so that nothing may get damaged on the way to the fishfinder. How we have assembled such an outdoor case the DIY-way, we are going to show you in part 3 of this article - but first things first: And with that said let's take a look at our recommendations for the best fish finder to outfit a fishing kayak.
2.5. The three top fish finders for a fishing kayak
2.5.1. Garmin Echomap Plus 62cv
Back to the table of contents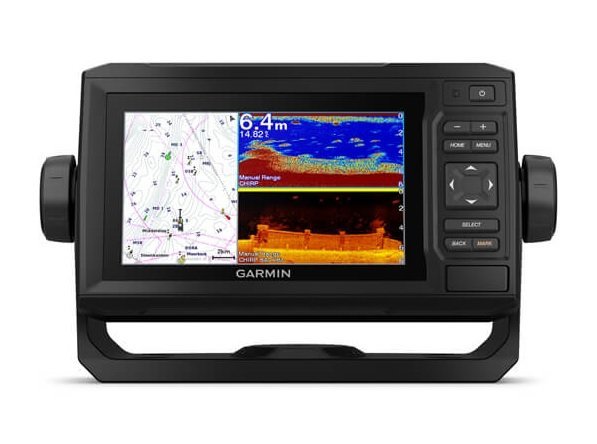
A high-resolution and 6-inch screen, its chirp capabilities and flexible use on different types of waters are the strengths of this Garmin fish finder. Technically, 2D Chirp and DownScan (Downvü) are on board. A chartplotter with a 5 Hz GPS and WLAN complete the equipment.
The EchoMap Plus 62cv is equipped with Garmin CHIRP technology and combines it with the Garmin ClearVü sonar functions. With the appropriate chirp transducer, clear and differentiated echo sounder images are generated, which ultimately also lead to more success when fishing and thus to more fish.
However, those who value excellent sonar images in the 2D range should equip the device directly with the high-chirp transducer GT22.
Main features of the Garmin Echomap Plus 62cv:
- Chirp technology,
- 2D Chirp and ClearVü sonar methods,
- Quick Draw Contours Cartography,
- Keyboard operation,
- Garmin GT20 transducer,
- 6 inch display with 800×480 pixels,
- Transmitting power 500 W,
- microSD card slot,
- GPS with chart plotter,
- Garmin G3 Bluechart water charts.
- Price with transducer GT20 : approx. 600 US$
2.5.2. Lowrance Hook Reveal 7 with TripleShot transducer
Back to the table of contents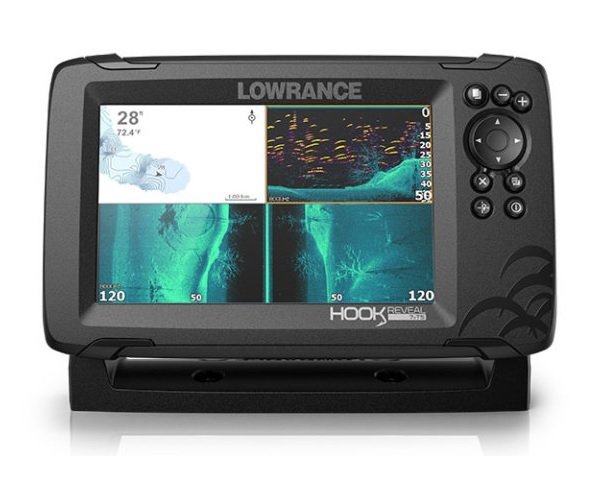
In the third Hook generation, the devices and HDI transducers have been fundamentally revised. As a result, they now feature Chirp in parallel with Down- and SideScan. A special highlight is the Reveal function. With this the fish arches from 2D are integrated into the DownScan image as illuminated arcs, so that an optimal representation of the detected fish population is directly available.
This Lowrance fish finder makes adjustments and fine tuning automatically. Therefore, no manual adjustment is necessary for first-class images: What is perfect for the use with a fishing kayak.
Main functions Lowrance Hook Reveal 7:
- FishReveal,
- Genesis Live Real-Time Mapping,
- Automatic fine tuning,
- TripleShot transducer with CHIRP, Down- and SideScan,
- 7 inch SolarMAX display with 800×480 pixels,
- Transmitting power 500 W,
- Keypad operation with direct access,
- microSD card slot,
- GPS with chart plotter,
- Mapping options such as C-MAP, C-MAP Genesis or Navionics.
- Price with transducer: ca. 550 US$.
Our practical test of the Lowrance Hook Reveal can be found here.
2.5.3. Raymarine Element 7 HV with HV100 transducer
Back to the table of contents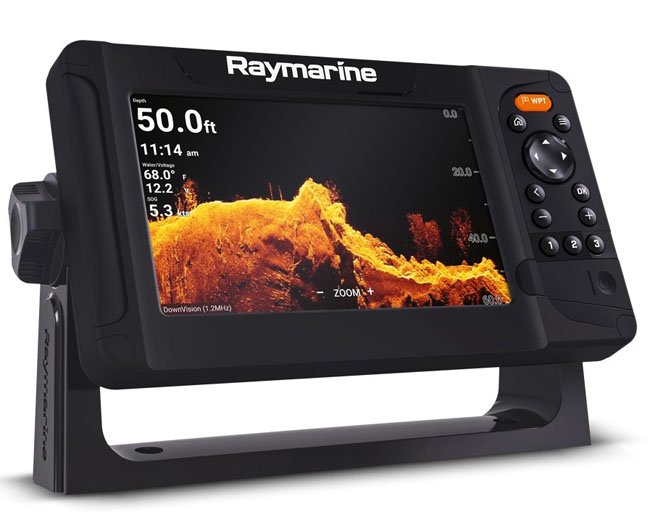
The Raymarine fish finders from the Element model series have it all. With Chirp, Down- and SideScan as well as RealVision-3D, four sonar technologies are integrated. Which moreover can easily by implemented by the newly developed HV-100 all-in-one transmitter. With this new innovation, the company has taken the sonar technology to the next level. Hypervision is the keyword: HyperVision operates at 1.2 MHz for DownVision, SideVision and RealVision 3D. Traditional conical high-CHIRP sonar operates in the 200 kHz range; it is not a fourth 1.2 MHz channel.
Although this is somewhat at the expense of depth range - the advantages for shallow water use are obvious. One does not have to be a fortune teller to predict market success for this model series. The recommended price of the 7-inch version (including the HV-100 encoder) of around 700 € is a real price-performance gem that puts the competition to shame. Especially since integrated 3D functions are not to be found elsewhere in this price range.
Of course, the current retail price of less than 700 € also has some drawbacks. The touchscreen with the glass surface of the Axiom series is eliminated to make place for an option with a keyboard. On the one hand, you may miss it, while on the other you possibly will be pleased that the card slot can be handled from the front again. The dignified Lighthouse 3 operating system has also been simplified and is now called Lighthouse Sport, which is more specifically tailored to the fishing community. Also missing is the digital sonar option of the Axiom models at 200 and 50 kHz.
Otherwise, the equipment of this Raymarine fish finder is comparable to the Axiom series in terms of hardware (smaller RAM) apart from the missing marine network integration. The streamlining of the Element models has been successfully accomplished. Considering the complete package, these compromises can be easily forgiven. Above all considering the more than attractive price.
Raymarine Element 7 HV - key functions:
- Operating system: Lighthouse Sport.
- Screen: 800 x 480 pixels WVGA.
- Operation: Keyboard.
- Sonar: Built-in CHIRP sonar, DownVision (standard and hyper), SideVision (standard and hyper), RealVision™-3D (standard and hyper).
- Reachable depths: CHIRP Sonar = 900 feet (274 m),
- DownVision™ Standard = 600 feet (183 m) | DownVision™ Hyper = 100 feet (30 m),
- SideVision™ Standard = 91 m (300 feet) | SideVision™ Hyper = 30 m (100 feet),
- RealVision™ 3D Standard = 91 m (300 feet) | RealVision™ 3D Hyper = 30 m (100 feet).
- Fully equipped plotter
- Chart options: Raymarines LightHouse NC2, Navionics, C-MAP Essentials (basic equipment) , C-MAP 4D MAX+. Compatible with all maps listed in Raymarine's map store.
- SD card slot: 1
- Network: NMEA2000 port.
- Connections: Wifi, Bluetooth.
- Internal memory: 8GB SSD.
- Transmitter: 4-in-1 HV-100.
- Price with transducer: ca. 550 US$.
3. How to build a DIY waterproof power supply for your fishing kayak?
3.1. Important notes and disclaimer
All electrical work and installations should only be carried out by qualified persons who have the necessary expertise and knowledge to carry out such type of work properly. 12V batteries or accumulators are no toys and, if handled incorrectly, are a serious source of danger for serious personal injury and damage to property.
Disclaimer: This post is merely a description of a project we did to build a waterproof power supply for personal use. It is not - and should not be conssidered as - a construction manual for such a project or anything similar. Since our own safety is very important to us, we have carried out and practically tested this project with the necessary care and to the best of our knowledge. We do not assume any liability or guarantee for the conclusiveness of the planning, the construction and the functional reliability of the final product. Whoever uses this description for the reproduction of a similar project does so at his own risk. Any liability on our part derived from following the plan is excluded.
3.2. Embedding the battery waterproof
The following describes our original battery-box project; its waterproofness has not been independently verified. You pack the battery in a small waterproof outdoor case, put two waterproof jacks on top and an On/Off switch with LED, wire all components on the inside and the completed assembly still needs an appropriate electrical and water-ingress assessment before use. Ideal would be: The power connection to the fish finder can be interrupted at any time with the switch.
The cable length of the power connection should be sufficient to run from the battery box to the depth sounder without being excessively stretched. If this is not the case, you should prepare an extra cable with plug and waterproof socket, shorten the power connection cable of the fishfinder and attach a plug for the connection of the two cables. This in total would require the purchase of three additional plugs and a socket in the procurement list, since an additional plug is also needed for the charger.
3.3. The blueprint
First we have a look at the wiring diagram. This shows how the connections between the individual components are made. The necessary parts are shown in the list at the end of the article. There are three types of connections:
- Flat plug connections,
- solder connections
- and screw connections.
The 3 mm LED must be designed for 12V. If it is not, you solder a suitable resistor and appropriate cable connections.
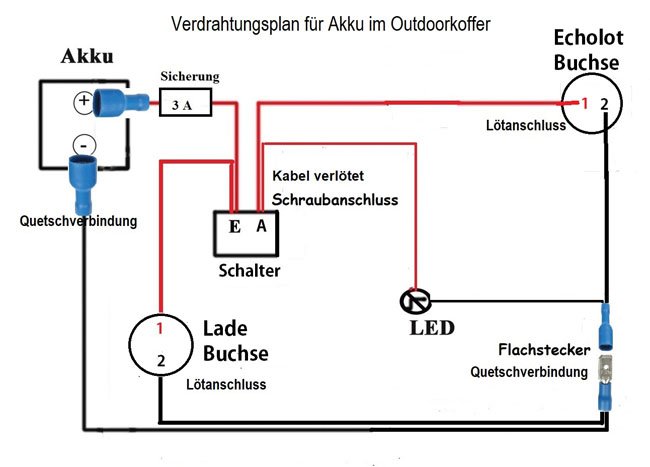
3.4. Step-by-step assembling procedure
- First step: Solder 0.5 m long pieces of cable to the two sockets. Red connects to pin 1, black to pin 2. The solder joints are covered with 3 mm heat shrink tubing (compare figure below).
- Second step: Drill four holes in the outdoor case lid. 10 mm (x2) for the two sockets, 8 mm for the switch and 5 mm for the LED. If the holes are too narrow (which is often the case with the sockets), you can easily widen them with (insert a scissor o screwdriver-tip and turn it around).
- Third step: Insert the sockets, the switch and the LED and wire everything thing according to our diagram. Several cable ends must be brought together and connected with flat plugs (crimp connection - black cables) or soldered (red cables in the switch inlet).
- Fourth step: Secure the cable routing (see illustration below) with the adhesive bases. Then interconnect the cable fuse (simply provide it with a cable plug and socket and attach it to the live red cable). Last but not least, you attach cable lugs for the battery connection.
- Done: That was it (as easy as it sounds)! Now insert the battery and fix it to the center of the case bottom with the Velcro DUO tape.
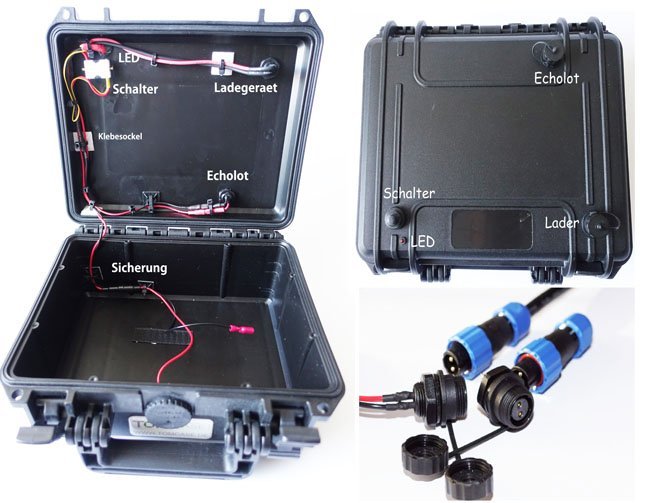
The finished case can of course also be used for a mobile fish finder. For this purpose only four holes for the mounting are missing on the lid. The Outdoor Pack fits either behind or under the seat or optionally in an open storage compartment with a securing bungee strap.
3.5. Needed parts: The full list
This is the full list of components we used to build our own DIY-waterproof power supply for a fishing kayak:
- 1 outdoor suitcase Tomcase XT 235H105,
- Plugs / sockets (all 0,5 in versions):
- 2 sockets 2 pole (waterproof),
- 2 plugs 2 pole (waterproof),
- 1 plug for the charger,
- Possibly 2 plugs + 1 socket for the cable extension,
- 1 push button switch (from grandma's bedside lamp - 6A)
- 1 cover for the switch,
- 1 LED (red dim 12V),
- 1 mounting frame for the LED,
- 3,95 ft care wire red (0,06 in),
- 3,95 ft m car wire black (0,06 in),
- 1 cable fuse (3A),
- 6 adhesive bases (0,8 x 0,8 in),
- 6 cable ties (3,95 x 0,11 in),
- 1,65 ft velcro tape (0,8 in with adhesive backside),
- 4 in heat shrink tubing (3 mm and 6 mm),
- 1 flat plug + socket (0,17 in - blue),
- 2 flat plug sockets (0,3 in red).
With that we have reached the end of our article "Fishing kayak: Which is the best kayak for fishing?". If you have questions, tips or experience with kayak fishing and want to share your experiences with us, leave a comment or send us a mail. We are looking forward to your feedback. By the way: Did you already have a look at our other fish finder reviews in our extensive fish finder test (including the newest models of all important fish finder manufacturers like Garmin, Lowrance, Humminbird or Raymarine) - if not, we invite you to do so! Hope that the information and tips provided by us are helpful for you - and that you are going to visit us again. Meanwhile: Have fun on your next fishing trip and “Petri Heil”! - Martin and Jens.