
UNDERSTANDING WATER · GRAVEL PIT LAKE
How Do You Find Fish in a Gravel Pit Lake When Everything Looks the Same?
What makes fishing a gravel pit lake different from fishing a natural lake?
A gravel pit lake does not form over centuries like a natural lake. Excavation, backfilling, access roads, former work areas, and steep slopes shape its bottom. On a map, this often looks clear and enticing: just a few meters from shore, the bottom drops quickly into a deep basin. That is exactly why the same contour is fished constantly on many waters.
The important distinction is not the label “gravel pit lake,” but the question of where excavation did not leave a uniform shape. A small ledge on the slope, a shallow point, an old access road, a vegetated area, a bottom transition, or the entrance to a bay can tell you more than a hundred meters of identical steep drop-off.
You also cannot determine the nature of the water itself from how the lake was created. A young, clear gravel pit lake with little vegetation behaves differently from an older one with reeds, weedy bays, more turbid water, and many small fish. That is why there is no fixed rule such as “gravel pit lake = fish deep.” The lake's shape merely gives you the first map for asking better questions.
How do you read a gravel pit lake's map and shoreline before casting?
A depth chart is particularly useful for a gravel pit lake because many areas remain invisible from shore. Closely spaced contours indicate a steep slope, while wider spacing indicates a shallower plateau or gradual transition. But the chart does not mark fish. It shows you where a functional area might develop.
First mark four things: the shallowest accessible zone, the first distinct drop, an irregularity in the slope, and an area where cover or bait is plausible. This could be a weedbed, reeds, an inflow, a change in shoreline angle, a small point, or a visible change in water color. Use these to create three test areas, not twenty saved pins.
At the shoreline, add to what the map tells you. Where is the wind pushing small particles or floating debris? Where do the reeds begin? Where does the bottom underfoot change from gravel to softer material? Where do you see small fish, insects, fish at the surface, or an open lane between plants? These observations give an abstract drop-off a purpose.
If you use a plummet or fish finder, do not merely confirm the maximum depth. Look for the shape of the irregularity: a small ledge, the base of a slope, a drop-off in front of the weeds, or a channel leading to a bay. The guide Reading Depth Contours helps turn this into a logical search plan.
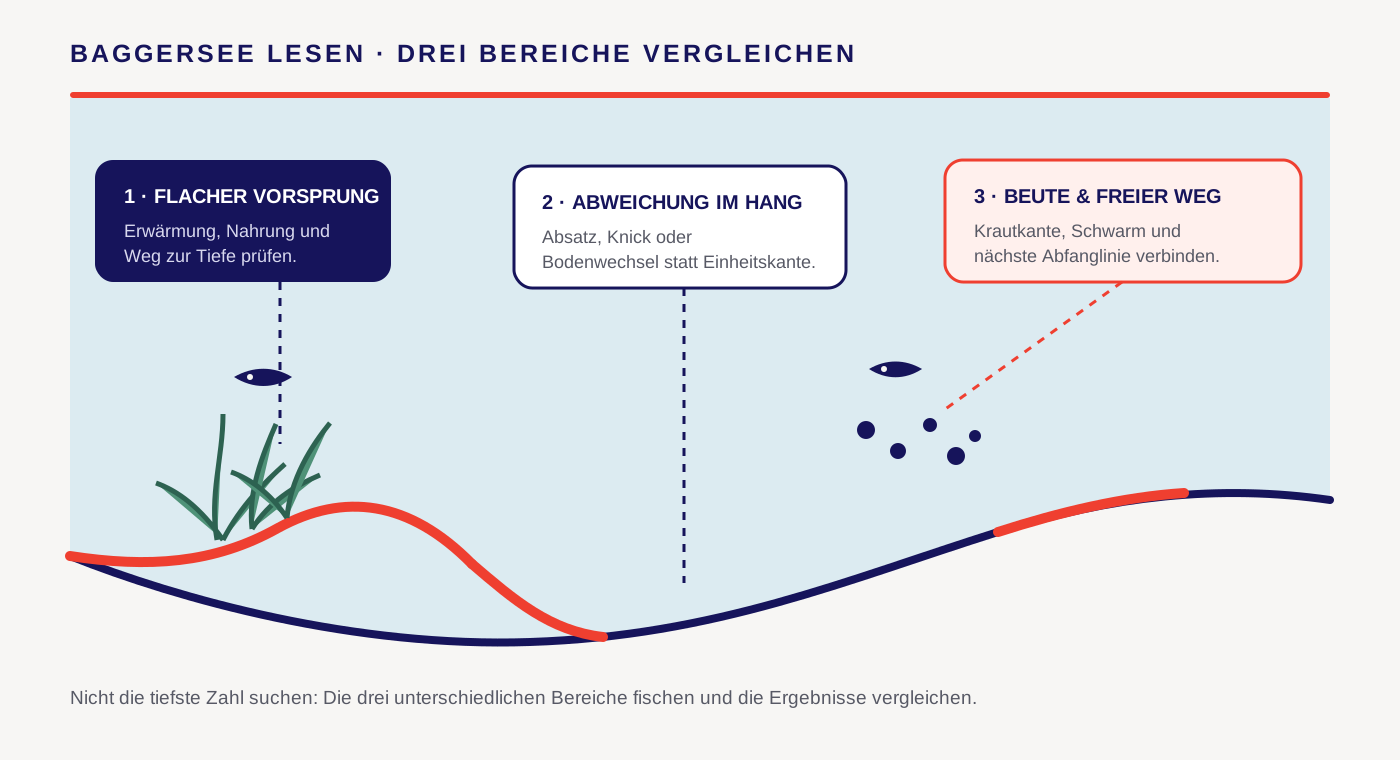
Which three areas should you check first in a gravel pit lake?
1. Shallow area with access to deep water
A small bay, shallow shoreline section, or plateau is not automatically a spring spot. It becomes interesting when water, food, or baitfish can concentrate there and a drop-off or channel is nearby. In spring, this connection between shallow water and an escape route can be more productive than the middle of the deep basin. In summer, the same area may behave differently because of heat, swimming activity, or low oxygen.
2. Irregularity along the excavation drop-off
The long, uniform steep drop-off provides information, but it is rarely your best choice by itself. Look for where it becomes shallower, bends, meets hard or soft bottom, divides into two steps, or intersects vegetation. Do not fish only across the transition. A cast parallel to it keeps your lure at the relevant depth longer. The article Reading Drop-Offs and Transitions shows how to check the top, slope, and base separately.
3. Bait and open hunting water
A clear gravel pit lake can strongly draw your attention to the shoreline drop-off. Nevertheless, baitfish may hold over deeper water, along the edge of vegetation, or in a wind lane. In that case, the best-looking section of the map is not your starting point. Instead, ask where the target fish can reach or intercept the school. Check the edge of the baitfish, the drop-off beneath them, and the nearest structure—not just the middle of a visible school.
Why isn't the steepest drop-off in a gravel pit lake automatically the best spot?
A steep slope can be useful to fish: short routes between shallower and deeper water, a distinct transition, and often an easily controlled depth. But that does not mean every fish spends all day on the slope. A bare wall without food or a special connection can be just as empty as the open middle of the lake.
So look for the added feature: drop-off plus something. Drop-off plus weedline. Drop-off plus plateau. Drop-off plus baitfish. Drop-off plus bay entrance. Drop-off plus a windward shore or a small sheltered area. These combinations help you understand a situation rather than just a geometric shape.
When fishing, test the drop-off in sections. Start with the shallower top, then the slope, followed by the base, and finally fish parallel to it. Do not change everything at once. If you change the lure, casting direction, depth, and location after three casts, every unsuccessful cast tells you nothing. A controlled comparison, by contrast, tells you whether your lure is snagging on the bottom, sinking too quickly along the slope, or getting a bite right at the transition.
How do you find bait rather than just attractive structure in a gravel pit lake?
In clear lakes, you may sometimes see small fish, flashing sides, or feeding activity at the surface. In more turbid water, movement, midges, the edges of reeds and vegetation, or the fish finder become more useful. No single sign is proof. Several signs in the same place make a working hypothesis more plausible.
Baitfish do not simply hold “on the drop-off.” They may seek shelter among plants, move across a plateau, or use a different shore when the wind blows. A pike may wait along the edge of a weedbed, a perch may follow a small school over more open water, and a zander may use the transition to deeper water. This gives you a clear process: find the bait first, then test the nearest interception line.
The bottom can also matter indirectly. Gravel, mussels, softer sediment, plant debris, or a hard transition influence where food accumulates and which fish forage there. The planned article on lake bottoms will add this dimension later. Until then, record what you actually know about the bottom and depth where you get bites, rather than turning one bite into a universal rule.
How do season, wind, and light shift your gravel pit lake search?
In spring, shallower, sheltered areas and their connections to deeper water can become important because water and food develop differently on a local scale. In summer, visibility, vegetation, temperature, and accessible depth become more important. In deeper lakes, the water can stratify; when that happens, a map alone cannot tell you the depth at which bait and target fish are accessible. The thermocline in a lake is therefore part of the logic of fishing gravel pit lakes.
In fall, vegetation and baitfish movement change. A drop-off that was overgrown in summer may suddenly become more accessible; an open-water zone may become more important. In winter, stable conditions and accessible food matter more than the idea that fish must always hold only in the deepest water.
Wind can move food, turbidity, and surface water. But it can also make an area rough enough that fish use more sheltered structure. Light and water color affect visibility and concealment. Read these factors together instead of turning “wind blowing toward shore” into a rule for catching fish. The article Wind, Light, and Water Color helps put these factors into context.
What does a practical plan for your first day at a gravel pit lake look like?
- Identify restrictions: Find out about no-entry zones, nature conservation areas, swimming areas, and permitted fishing zones. Steep banks and unstable edges are no place for risky shortcuts.
- Read the map broadly: Mark a shallow area, a distinctive drop-off, and a possible bait zone.
- Walk the shoreline: Observe wind, visible vegetation, reeds, water color, and activity before setting up your first rod.
- Check area A: Fish the shallow connection to deep water using consistent casting angles and a known depth.
- Check area B: Test the bend, ledge, or end of the weeds along the drop-off with parallel and angled casts.
- Check area C: Find the bait or open transition and retrieve the lure at the suspected depth.
- Evaluate: Record bites, follows, bottom contact, wind, and time. Then you will not start from scratch on your next visit.
This process works even without a boat or a perfect map. In that case, shoreline selection becomes more important: where can you effectively reach a transition, bay entrance, or edge of a weedbed? A well-known, open steep slope is not automatically better than an inconspicuous place where you can keep your lure under control along a transition for longer.
Which mistakes make gravel pit lakes unnecessarily difficult?
- “Deep is always right.” Deep water is only one possible refuge. It must connect to bait and current conditions.
- “The map shows the spot.” It shows shapes. You must check water level, vegetation, bottom, and bait at the lake.
- “I've already fished that drop-off.” One cast across the slope does not test its length, base, and shallower side.
- “The lure is the problem.” First check the location, depth, casting angle, and retrieve. The best lure cannot tell you anything on the wrong slope.
- “All gravel pit lakes are the same.” Water clarity, age, use, vegetation, and fish populations change how each structure functions.
A gravel pit lake often looks simpler than it is: a clear map, steep drop-offs, and deep water. Your advantage comes from looking beyond that initial shape. Find the irregularity, locate the bait, and connect both to an accessible transition. That turns a large, seemingly uniform body of water into a plan for your next cast.