
UNDERSTANDING WATER · RIVERS AND CANALS
How Do You Find Fish in a River Instead of Just Casting to the Next Groyne?
Why Isn't a River Just a Lake With Moving Water?
A drop-off in a lake can combine prey, cover, and depth. In a river, there is another question: How much energy does a fish need to hold there? The main current brings food and oxygen, but it is not a practical place for every fish to remain during every phase. Alongside it are seams, back currents, deep channels, calm pockets, and transition zones that make up the real search area.
The river constantly changes these areas. After rain, rising water, falling water levels, or a long dry spell, the same section not only looks different—it functions differently. A familiar groyne head, riprap bank, or outside bend may then have different depths, currents, and prey routes. Therefore, record the conditions. A spot name without water level and current information tells you almost nothing.
Your first look should not be at the lure, but at the water: Where is the main current? Where does it slow down? Where does it accelerate? What is drifting, and in which direction? Where can prey hold briefly without immediately being swept away?
What Does the Current Tell You About Potential Fish-Holding Spots?
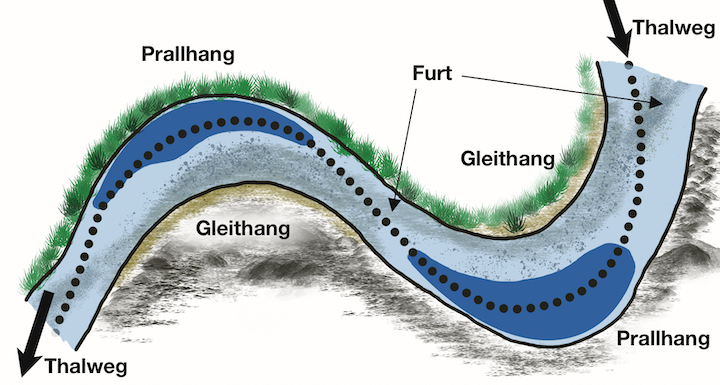
Main current, side currents, and slack water are rarely cleanly separated. A current seam forms between them. Debris, insects, and small fish may travel along it, while a predator can use the adjacent area with less energy expenditure. On an outside bend, the current is often pushed against the cut bank differently than it is against the shallower point bar. Water may run faster or deeper in a channel than along the adjacent shoreline.
That does not mean fish always hold directly on the most visible line. Check the zone in front of it, the calmer side, the inflow, and the outflow. In some situations, the edge of the main current is productive; in others, it is the edge of a backwater or a deep pocket downstream of an obstruction. Do not look for “current,” but for the combination of food and slack water.
Surface signs help, but they do not reveal the entire water column. Foam, leaves, and floating debris usually show only what is happening at the surface. The edge of a deep channel or a countercurrent near the bottom may follow a different path. When permitted and safe, use your rig to feel the bottom and compare lure control at different angles.
Which River Areas Should You Check First?
- Channel and channel edge: A connection between the deeper flow and the shallower margin. Check not only the middle of the channel, but also its edge and where it meets calmer areas.
- Outside bend/cut bank: Can concentrate depth and stronger current. The adjacent calmer edges and inflows are often productive.
- Point bar/inside bend: Often shallower and slower. Depending on prey, water level, and seasonal phase, the transition to the channel can be valuable.
- Backwater and calm pocket: Can provide shelter and food. Read the inflow, middle, and outflow separately.
- Inflow, side channel, or harbor edge: Can create food, temperature, or turbidity differences; local regulations and closed areas take precedence.
- Groyne: Is not a single spot, but several current zones. The transition zones are especially important.
A map can show you the channel, bends, and groyne field. But it cannot reliably explain how the water is flowing today. Always combine it with observations from shore or a boat. The zander article Shoreline, Drop-Off, and Current explores this logic in greater depth using specific river features.
How Do You Read a Groyne Correctly?
The groyne head is visible and therefore often the first choice. But it may be heavily fished and is not suitable at every water level. The upstream side can bring pressure and food, the head can form a strong transition, the backwater can provide slack water, and the outflow can create a line along which food returns to the main current. Check these areas as a route.
Similar features next to the well-known groyne are often overlooked: a small bend in a sheet-pile wall, a point of land, woody debris, the edge of riprap, or an inconspicuous inflow. If the familiar spot is occupied, do not simply look for the next numbered groyne. Look for the same current type with a better connection or less fishing pressure.
Safety and regulations explicitly take priority here. Groyne fields, boat traffic, deep water, slippery rocks, and rising water levels are no place for risky casts or routes. Plan your access and return route before fishing.
Why Does the Water Level Change Fish-Holding Spots in a River So Dramatically?
As water rises, new shoreline areas, flooded zones, or side channels may become accessible. At the same time, pressure increases on some calm areas. As the water falls, the flow often becomes more concentrated; channels, edges, and outflows become more distinct. These statements are not a substitute for rules specific to your river, but they show why you should record the water level as a condition.
Do not look only at the current moment, but also at the trend: Has the water level been rising, falling, or stable for days? Relate that to turbidity, temperature, and prey. A rapid rise after heavy rain is not the same situation as a slowly falling water level in clear water.
How Do You Find Prey in a River?
Small fish may hold in calm areas, behind obstructions, near vegetation, beneath shoreline cover, or close to an inflow. They may not always be visible in the main current, but they can be carried along a seam. When you find prey, do not cast only into the middle of it. Check the edge toward deeper water, the boundary with the faster current, and the route a predator might use to cut it off.
Also observe what enters the river: insects, drifting debris, inflowing water, or seasonal food from the shoreline. These are clues, not guarantees. The important step is making the connection: Where can a fish position itself to reach this food without wasting energy?
How Do You Fish a River Section Methodically?
A lure retrieved upstream, diagonally, or downstream behaves differently. The right direction is the one that keeps it in the suspected strike zone long enough. A diagonal cast can follow an edge or seam longer; a lure rises or works differently against the current than with it. Make sure you can still feel where it is—especially in wind and strong current.
With a soft-plastic lure, a small lift can be useful if it keeps the lure at the height of the edge. Heads that are too heavy or large hops make it quickly drop out of the zone. A longer pause may work in a calm pocket; in faster water, the lure may need a more active retrieve simply to remain on the line. Technique follows from reading the water, not the other way around.
How Do You Plan Your First Day on an Unfamiliar River?
- Check safety and regulations: Confirm access, water level, boat traffic, protected areas, and closed areas before the first cast.
- Read the main current: Observe visible current, seams, calm zones, inflows, and outflows.
- Choose three types of structure: For example, a channel edge, groyne outflow, and sheltered shoreline area.
- Assess prey: Where are small fish, food, or activity in relation to the current?
- Test angle and depth: Deliberately compare the bottom, the height of the edge, and the water above it.
- Record water level and results: Only then can you recognize next time what function the spot served under those conditions.
In a river, you do not catch fish “at the groyne” or “at the drop-off.” You fish a transition zone that today combines a prey route with energy conservation. If you recognize that before choosing a lure, you will be less dependent on well-known, occupied spots and less reliant on chance.
Source material and adaptation: This article combines the existing river articles on zander, pike, and carp, as well as the original graphic from the carp river article. The content is presented as general principles for reading water; the specific species, closed season, and local fishery regulations must always be checked separately.