In the following article we want to show you how to interpret and analyze your sonar images correctly. Many boat anglers decide to use a sonar to find fish and hotspots faster. But the disillusionment comes shortly after the expensive purchase, because the fewest pictures of a fish finder can be interpreted clearly at first sight. As a non-expert one often knows nothing to do with the pictures and travels kilometer after kilometer before the hooks even see the water. The more important it is to educate yourself to find fish faster and have more time for fishing.
“90% of the fish can be found on 10% of the surface of a lake.“
(Carl Lowrance)
-
The Ultimate Fish Finder Guide
Download 40 pages for free now
Reviews ( 17 )
The bad thing is that most manufacturers of echosounders do not manage to provide important and above all basic information for interpreting the sonar images. There is raving about frequencies, DownScan, CHIRP or whatever and all sorts of technical details are advertised so that the customer can buy the most expensive model in the best possible way.
And what comes next? Yes, then you often don’t get such good support anymore and with luck you have bought your fish finder from a good dealer. … Now it is your own responsibility to educate yourself … somewhere in forums or groups on social media.
Can we change that? We will probably not be able to directly influence the approach of the manufacturers. But we can show you in this article how even with basic knowledge you can evaluate and interpret your sonar images much better. Because the best fish finder is useless unless you know how to interpret the sonar images.
Basics of how a fish finder works
At the beginning we would like to briefly explain the basic functioning of sound under water. The transducer of the fish finder sends or pings a sound into the water. This sound propagates spherically in all directions. Manufacturers of echosounders have succeeded in concentrating the sound and thus directing the sound particularly strongly in one direction – for example downwards in the case of the traditional transducer.
As soon as the sound wave hits an object (ground, stone, plant, fish, etc.), it is reflected and an echo is generated. When the sound returns to the transducer, the fish finder calculates the distance from it to the object. Additionally the fish finder calculates how strong the reflected signal is. Based on this information a possible fish, structures like plants or the bottom can be displayed on the screen.
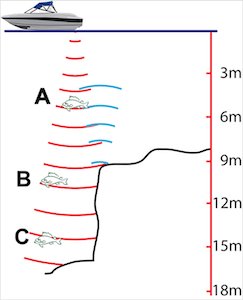
The functionality is fundamental for the functioning of sonars or underwater communication in the professional field. The sound propagates under water at a speed of approx. 1.500 m/s (4,900 ft/s). If the water under the boat has a depth of 750 m (2,460 ft), it would take one second for the sound to travel down and up again.
From these calculations the image of the fish finder is built up – piece by piece
So all echoes of a ping are first received by the transducer and then calculated by the fishfinder. Each echo is assigned a color depending on the strength of the signal and displayed in the A-Scope or RTS. These two representations of the echo of a traditional fish finder are in real time. In other words, everything that appears as colored pixels is happening right now under the boat. With every new ping the image is shifted to the left and shows us only the past.
This means that everything that most fishermen look at on their fish finder is long gone. Fish that are shown are not necessarily there anymore, but may have moved on. It’s quite incredible that the thing we are most interested in – “Where is the fish at the moment?” – is only shown in the tiny screen on the right!
The scary thing is that users sometimes don’t even know that their sonar has this display at all, because on some models you have to activate this option in the menu first. Many thanks dear manufacturers – for the detailed operating instructions.
Note: Of course you can find all the settings in the manuals of the respective fish finders. However, some sonar providers try to do their job well.
Weak and strong echoes
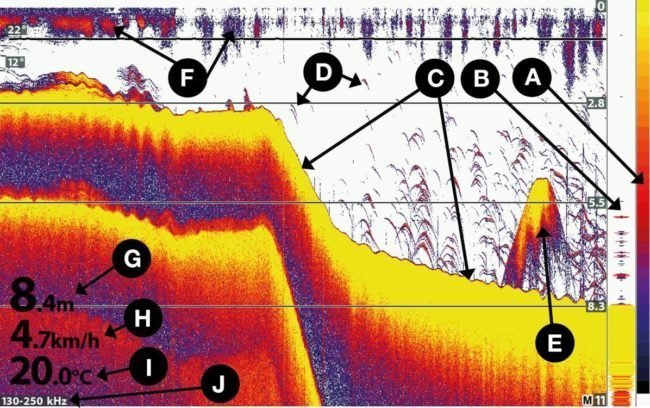
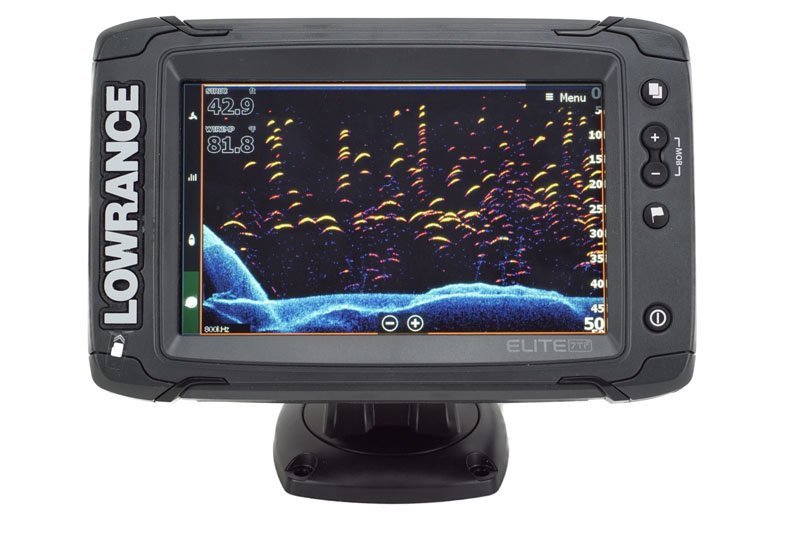
When we look at a sonar image, we recognize differently colored displays:
- Fish arches are sometimes blue, yellow, red or mixed colors, depending on the color palette.
- The bottom line can be thin, or thick and colored yellow, white or blue.
- In this image the color palette (point A) ranges from yellow (the strongest echo) to dark blue (the weakest echo).
A strong echo is almost always generated from the ground. The denser the lake bottom, the stronger the echo and the wider the bottom line. In our example, a very hard bottom is recognizable as a broad yellow bottom line. Point C points to two ground sections. The left arrow points to a thin bottom line (soft bottom) and the right arrow points to a thick bottom line (hard bottom).
With the fish arches there are many differences
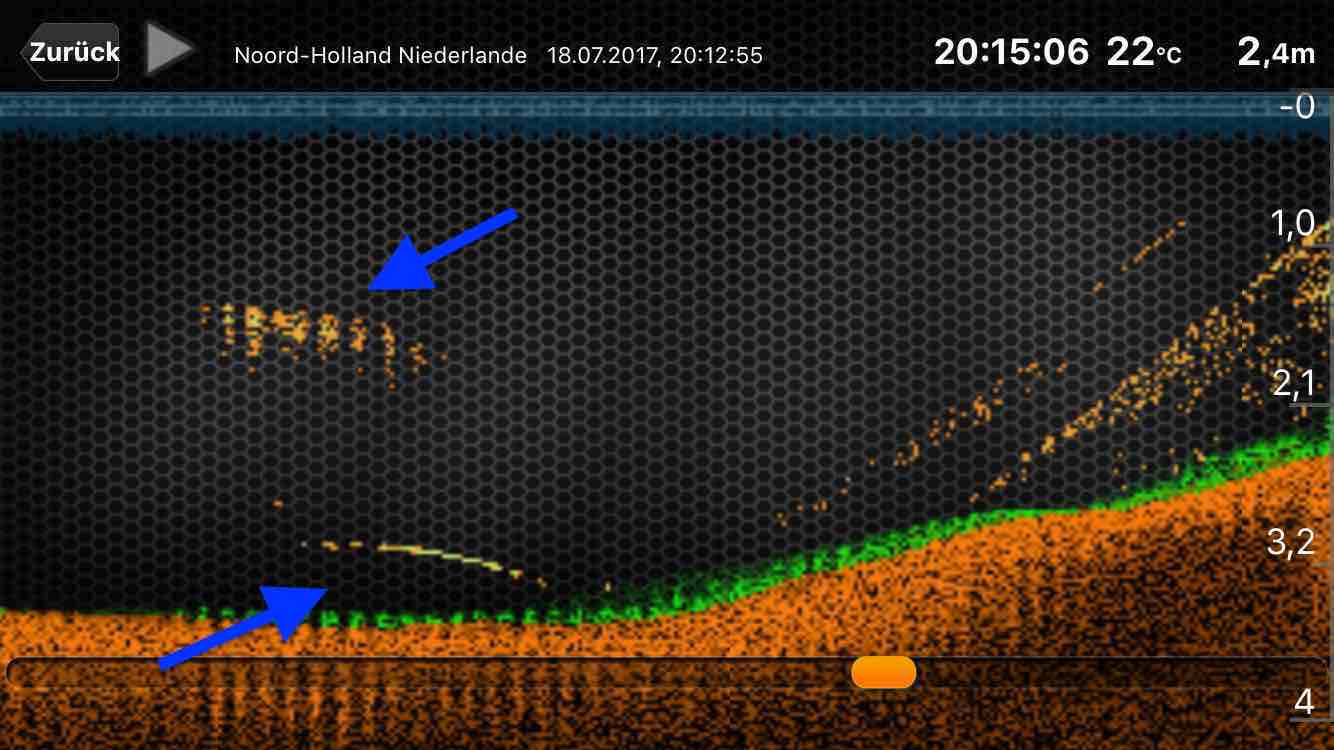
Blue Fish Arches: A weak Echo ( Point D). This can indicate that the fish is quite small and therefore no strong echo is produced. The fish can also be at the edge of the sonar cone. This makes the echo much weaker than in the main cone. So even large fish produce only very weak echoes. The meat and bones of fish have almost the same density as the surrounding water. Therefore hardly any echo is generated by them. The swim bladder alone, which is filled with air, is responsible for 90% of the echo strength.
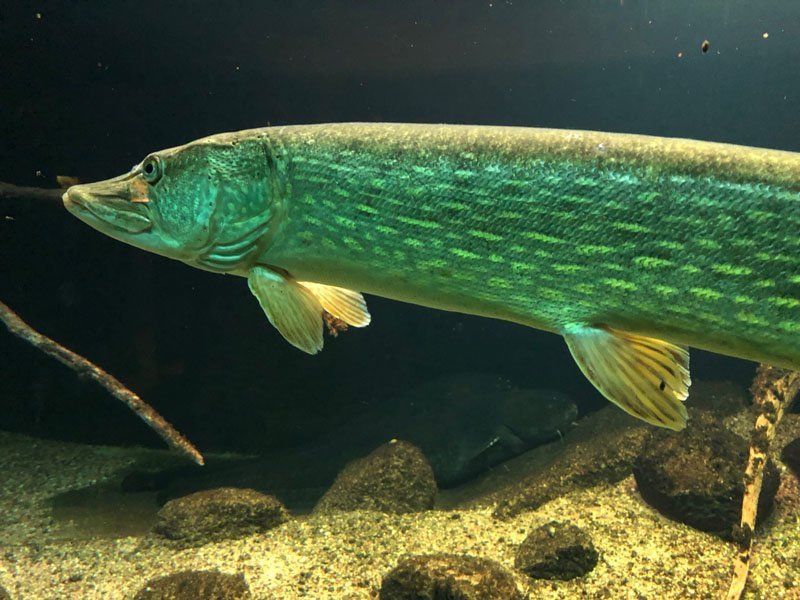
Yellow fish arches: Fish with a large swim bladder usually produce a strong echo and those with a small swim bladder produce a weak one. For this reason, larger perch with two air chambers can often be interpreted as large fish. Whereas for example, a big pike, which has only one air chamber, can be displayed the same size as the much smaller perch. Yellow colored fish arches mean here that the fish produces a strong echo. Either the fish is directly under the transducer and produces a strong echo due to the strong sound wave or the fish is very big, stands optimally to the transducer and can still be found at the outer edge of the transducer cone.
Even a shoal of fish, which we can see in point E, can produce a very strong echo because the sound wave cannot pass through the shoal of prey fish and is fully reflected. In this case, many small air bubbles produce a strong echo.
Red colored fish arches: You can also see them in the image. They are produced by a medium-strong echo and mean small to medium fish in the main cone or larger fish in the lateral areas of the attenuated sonar cone.
Note: Fish finder offer a seemingly unlimited number of adjustment possibilities. This way you catch 80% more fish with 20% of the settings. Learn how to read your fish finder correctly with our ultimate fish finder guide (book) – including the most important fish sonar tips from our 20 years of experience. Or take our video training and become a professional.
Raphaël G Vladimir M NICHOLAS JOHN REECY Henrik Dr. Manfred Marx Andreas Witz AK Lübbe Wolfgang Kalksee Enrico Indelicato Udo Josef Weiss Peter Holger Just Matthias Wappler M. Hermanns TACKLEFEVER

The Ultimate Fish Finder Guide
Download 40 pages for free now
Reviews ( 17 )
At what depth is the fish?
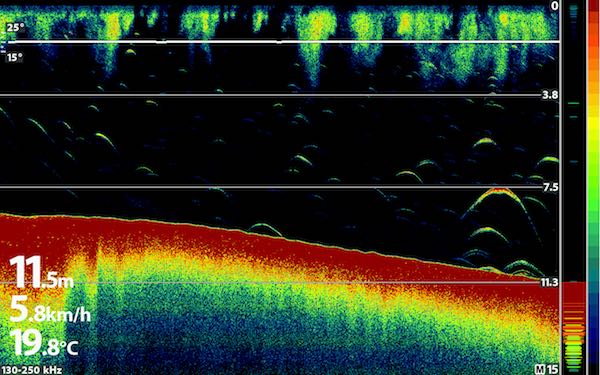
The sonar always shows us the depth of the fish. Right? Well, let’s put it this way, the only depth that the fish finder shows approximately as depth is the distance to a shallow lake bottom. With almost every fish arch we see in this image, we can’t say at what depth the fish really was.
Why is it not so easy to estimate the true depth of a fish?
The transducer of the fish finder calculates only the time needed for the signal and the returning echo. From this time the distance of the object, such as the fish, is calculated. So when we see a fish at a depth of 7.5 meters (25 ft) on a sonar, we only know that it is 7.5 meters (25 ft) away from the transducer. However, we do not yet know whether it is 7.5 meters (25 ft) below, left, right, in front or behind the boat.
Why is the depth to the bottom correct in this case?
The bottom line is formed from the strongest echoes of two to three pings. Since the strongest signal is always generated by a direct reflection, the strongest echo almost always comes back from the ground directly below the fish finder. Exceptions prove the rule. Consequently, the depth displayed of a rough lake bottom is also incorrect most of the time.
Can we really never know the real depth of a fish?
Of course – here are three characteristics that the fish is directly under the boat.
- The fish is at the bottom: in this case we can assume that it is really just under the boat. If the fish were not below the boat, it would be swallowed by the baseline and no longer be displayed.
- Fish directly below the water surface: Fish in the upper water pass through the narrowest part of a sonar cone. Thus they almost always cross the strongest part of the sound cone.
- Fish arches, which have the strongest color: Let’s have a look at the big, fat fish in the image. The fish arch glows literally at its top. If we compare the fish arch with the color palette (on the right in the A-Scope), we see that this is the strongest echo. For this reason there is a high probability that the fish is not only large, but is also almost directly under the boat at a depth of 7.5 meters (25 ft), since only from this position can it produce such a strong echo.
To illustrate that the fish finder only measures the distance to the fish (and not its current position to the boat), we have also illustrated the principle in a diagram. Both northern pikes in this example have a distance of 7.5 meters (25 ft) to the transducer. For us they would be displayed as two fish at the same depth on the screen. They would practically overlap.
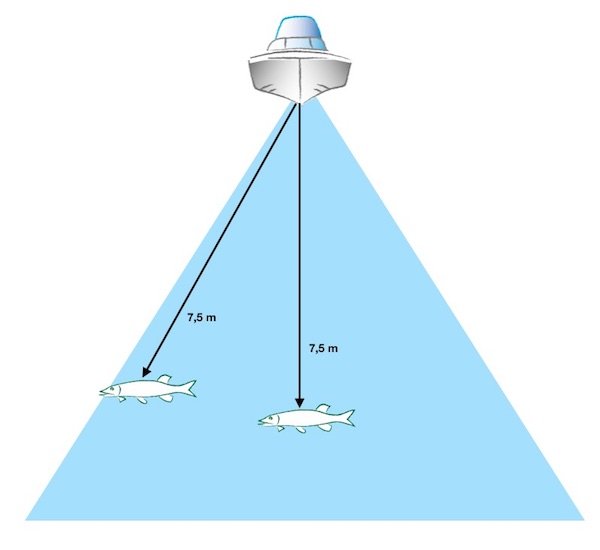
But the fish at the outer edge would probably be shown in a weaker color. The question you have to ask yourself now is: In the moment you see two large fishes on top of each other on your sonar screen, can you interpret for yourself that the fish are not necessarily swimming at the same depth or are in the same place under water?
Facebook group for reading sonar images: Join our Facebook group „How to read sonar images & catch more fish”. Here you can upload your sonar images, ask questions and have them interpreted. Join group
The fish dips
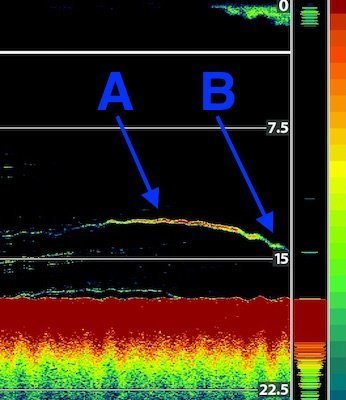
Who does not know this picture? A fish literally dives down. In our image the fish changes its depth of almost 11 meters (36 ft) (A) at 15 meters (49 ft) (B). The fish drops 3 meters straight down, doesn’t it?
Wrong – the fish does not necessarily dive down, it just moves away from the transducer. For us it seems to be only a submersion, since a 3D image of the under water world cannot be displayed on a 2D traditional screen of the fish finder. At least not in this view.
The main indication that allows us to correctly interpret the removal from the transducer is the color change of the fish. It changes from red (= strong echo / dot A) too green (= medium strong echo / point B). This is a perfect indication that the fish is moving away – perhaps alarmed by our engine – and the echo is getting weaker. In whichever direction the fish moves, it is also impossible to interpret.
CHIRP vs non-CHIRP
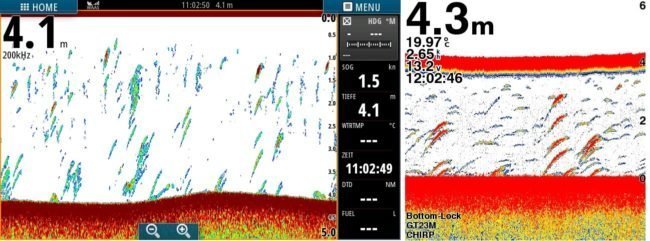
As we have already described in our book “The ultimate guide to fish finders”, it is often a challenge to clearly identify the echo signals. Often fish arches are shown unclearly or too coarsely. But the better the technology, the better the results will be.
Traditional sonar images are not always easy to understand. School of baits, underwater plants and rocks can often only be poorly distinguished. Often one is uncertain what the sonar display really shows. In addition there is the unusual way to read a sonar (from right (current) to left (already past)). That for many fishermen that takes getting used to.
Raphaël G Vladimir M NICHOLAS JOHN REECY Henrik Dr. Manfred Marx Andreas Witz AK Lübbe Wolfgang Kalksee Enrico Indelicato Udo Josef Weiss Peter Holger Just Matthias Wappler M. Hermanns TACKLEFEVER

The Ultimate Fish Finder Guide
Download 40 pages for free now
Reviews ( 17 )
You can pre-empt this guessing game with the latest technology and latest scanning methods. To ensure that the object separation is significantly improved and the resolution is multiplied, you simply use a CHIRP device in combination with a Full-Chirp transducer.
The two sonar images shown above, taken in parallel with a Simrad Go7 at 200 kHz (left) and a Garmin Echomap 52cv with CHIRP transducer (right), suggest how significant the differences can be. The detection rate improves considerably with a real CHIRP transducer, as shown in the image.
Photorealistic images
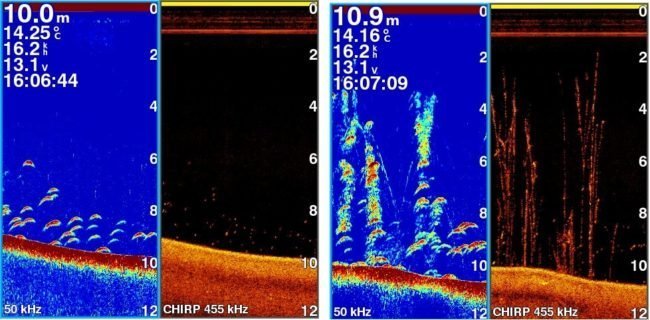
Fish arches on the traditional sonar view (blue background) are not always fish. Often other obstacles are shown as arches. However, especially these targets are real hotspots for smaller fish, as they provide food and shelter. The predators therefore regularly make forays to these hotspots. If you fish here at the right time, you will be able to catch some huge predators like pike, largemouth or a nice European pike perch. With the right sonar in combination with the appropriate settings, you can easily identify these hotspots.
You split the screen on your sonar. Parallel to the traditional Sonar you also select a Down Sonar view. This often brings immediate clarity to the underwater environment. In the traditional sonar image (left) you can see fish and underwater plants. The DownSonar (right) provides certainty. On closer look the fish is also confirmed (bright spots in the plants), so that there are no more confusions.
Is it possible to find hotspots on unknown waters faster with GPS?
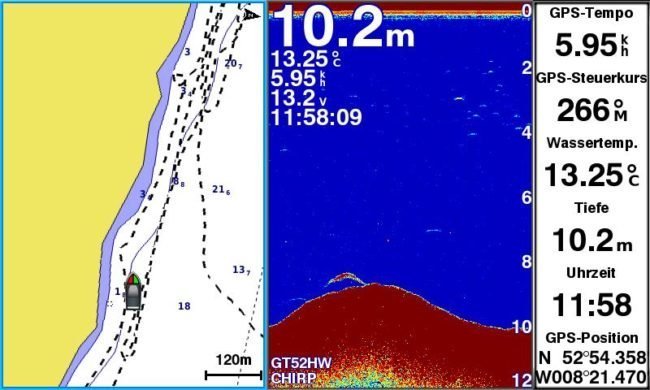
Let us answer this question with a practical point of view
It is October at the best pike perch or walleye time and for the first time you are at a large inland lake where you want to find your favorite fish. The first look should then be at the bathymetric chart on the chart plotter- to find quickly highly productive areas and locations based on the water body formation. In our example this is the steep left slope of the underwater flat that drops down to about 20 m (65 ft).
A lot of food fish can be expected at the shore, so smaller predators up to about 8 pounds could be at the first drop-off. The large predators often can be found in the early autumn during the day in deeper areas around the 10 m (32 ft) (“Finding Fish – The Smart Way – The Pike Perch” chapter. 8.4.9). It is possible to focus only on this area and trawl it slowly. When fishing, the fish finder is set to the frequency with the largest transmission cone (often Mid CHIRP or lower frequencies) in order to be able to scan as wide a range as possible during trolling.
The first track on the 7 m (23 ft) drop-off was successful and immediately produced two fishes of four and seven pounds. On the second track (10-15 m / 32 ft – 48 ft) single large predators were spotted on the sonar screen, which were then fished with a deep running lure ( trolling depth approx. 6 m / 20 ft | sonar screen on the right). As a result, we had two large individuals on the hook in two days.
SideSonar – Or: “Where is the fish really right now?”
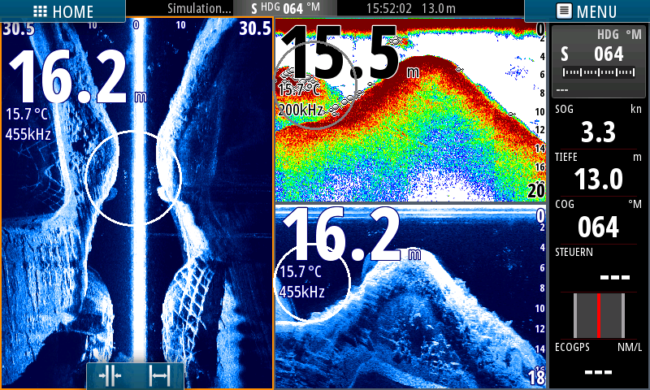
If you see a fish arch on your traditional echosounder, you have already taken a first step. But even if the sonar shows you that there is a big lump under the boat, with a traditional sonar you still don’t know on which direction it is located. This fact alone is not known to many fish finder users.
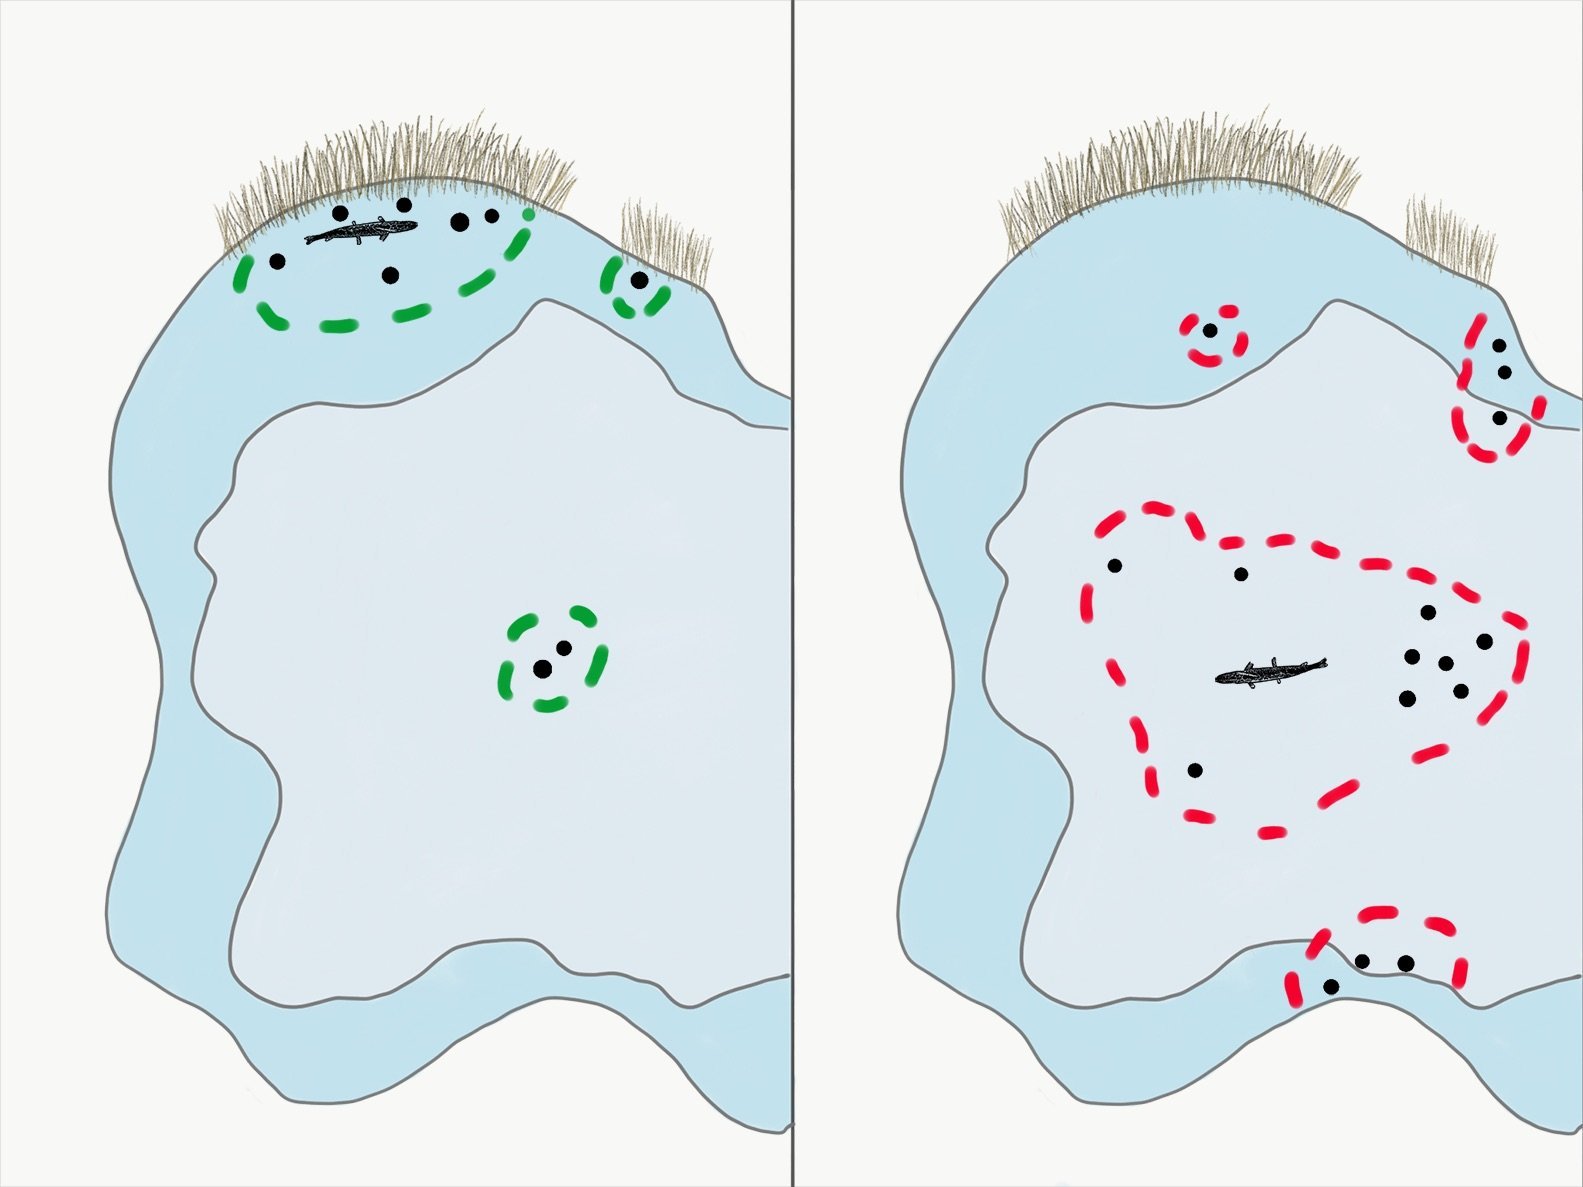
Depending on depth and settings, the fish can be several meters (ft) to the left, right, in front or behind the boat. For example, if a 60° beam angle is used with the fish finder, a fish that appears at 10 meters depth (32 ft) and forms a pretty fish arch could easily be either 10 meters left or 10 meters right of the boat. The sonar cone covers 104 square meters (1,120 sq ft) at a depth of 10 m (32 ft) and a 60° beam angle!
If you are not aware of this fact, you will probably make many unsuccessful casts before you give up frustrated.
The question of where the fish is can either be restricted by a few strategies. Or use the SideSonar technology in combined with the traditional sonar to answer questions quickly and reliably. For successful pelagic fishing, knowledge of the exact location of the fish under the boat is crucial. In the example shown, I have set the display with fish symbols for better differentiation. (which I never use on the water)
Although this representation is not as reliable, it stands out better against the terrain here than fish arches would do. It should be noted, however, that the scan areas of traditional Sonar and Down- and SideSonar are always different and therefore show different areas under water. The DownSonar only detects a very narrow area on either side of the boat, so fish may appear on the traditional sonar that are not visible in the DownScan until later. In this example, fish are shown on all three images, the SideSonar gives the exact position to the boat. With the right sonar you can mark the fish and navigate exactly with GPS.
Note: Read our detailed fish finder review here.
Note: The Sonar is one of the most expensive pieces of fishing equipment. Only if you know how to use a fish finder correctly and effectively, you can find productive hotspots. With the right knowledge you not only get more out of your equipment and can increase the pure fishing time enormously– inevitably you will you will catch more fish.
-

The Ultimate Fish Finder Guide
Download 40 pages for free now
Reviews ( 17 )
- Rated 5 out of 5
Raphaël G
Very effective. - Rated 5 out of 5
Vladimir M
The book describes the fish finder physics and builds up your understanding of how it actually works. I have yet to apply this knowledge with my Humminbird, but having that much of theory is extremely helpful in understanding and processing the sonar output. - Rated 5 out of 5
NICHOLAS JOHN REECY
The Deeper Guide was just what I was looking for. YouTube is full of reviews of the sonar but little in the way of education. I highly recommend for those wanting to better understand their Deeper sonar. - Rated 5 out of 5
Henrik
I am a beginner when it comes to fishing with fish finders. For me, the book has been very informative to judge the displays on the fish finder “realistically” and to recognize what limits there are when searching for fish with the fish finder. Now I know when I have to use my regular sonar and when I have to use my ClearVü or which settings I should apply to the device at which spot. I was impressed by the many illustrations, especially for understanding the functions. - Rated 5 out of 5
Dr. Manfred Marx
Very well written, so that it is understandable even for amateurs and structured concisely. - Rated 5 out of 5
Andreas Witz
An excellent book for learning about fish finders. - Rated 5 out of 5
AK
The ultimate fish finder guide is a beneficial introduction. I am excited to put into practice what I have learned. - Rated 5 out of 5
Lübbe Wolfgang
A well-written problem solver. - Rated 5 out of 5
Kalksee
The book is unmatched for understanding how a sonar/fish finder works. I was a fish arch hunter, and I suspect my fishing tactics will change. The book has clear writing, and you understand you understand a lot the first time you read it. I can only recommend it to anyone interested in technology. Thank you for this fantastic book! Thoralf - Rated 5 out of 5
Enrico Indelicato
I had absolutely no idea about fish finders. Since I read the book, I had a real Aha experience! For me, as a beginner, very detailed and uncomplicated explained. I can only recommend it! Best regards Enrico - Rated 5 out of 5
Udo
Reading this book has suddenly made my fish finders much more valuable to me! I realized that I made typical mistakes in interpreting the images, which I will now avoid. The authors use clear, understandable language and also explain the mathematical-physical basics very well. The fact that there is no advertising for one or another fish finder manufacturer has increased its credibility. At the same time, you get a solid impression of what is feasible today on this subject – and the “advertisements” of the manufacturers also helped. The book is ABSOLUTELY to recommend, because what good is an expensive fish finder if you too often draw the wrong conclusions from the obtained illustrations? In this respect, the money for the book is very well invested. - Rated 5 out of 5
Josef Weiss
I had to wait a long time for such great explanations. Thank you. - Rated 5 out of 5
Peter
It is a well-described, scientifically sound book highly recommended to anyone who wants to advance and doesn’t already know everything. - Rated 5 out of 5
Holger Just
Ich angle seit Jahren mit Echolot. Aber erstens bleibt man da irgendwann auf einer bestimmten Verständnisstufe stehen, diese konnte ich durch dieses Buch um einiges anheben. Als zweiten Aspekt mußte ich nach dem Lesen dieses Buches erkennen, dass ich durch “gefährliches Halbwissen” jahrelang Fehlinterpretationen hatte bzw. die Möglichkeiten meines Lotes nie richtig ausgenutzt habe. Also mein Fazit : Sehr empfehlenswert, die komplexen Zusammenhänge sind verständlich beschrieben. Das Buch ist ideal geeignet um sich in der angelfreien Zeit wertvolles Wissen für die folgende Saison anzueignen und beim Thema Echolot wieder uptodate zu sein. - Rated 5 out of 5
Matthias Wappler
Sehr gut!! - Rated 5 out of 5
M. Hermanns
Wer dieses Buch nicht liest, ist selber Schuld! Kein Vortrag, kein Presseartikel oder Bericht, Nein sogar keine Online-Schulung oder gar ein 365 Tage Support, vermittelt so viele essentielle Kenntnisse, wie dieses Buch. Nach zwei drei bebilderten Erklärungen wird dir klar, das ohne dieses Wissen, die Gewinn bringende Nutzung eines Echolotes gar nicht möglich ist. Beziehungsweise dir wird klar das du dein Echolot bisher sehr ineffizient genutzt hast und das dir eine Menge verborgen geblieben ist. Ich habe nach dem ersten gleich drei weitere Exemplare gekauft und drei guten Angelfreunden eine Anerkennung für unsere Freundschaft mit diesem Buch gemacht. Alle drei verfügen über 30 Jahre Bootsangelerfahrung und alle drei waren ebenfalls begeistert, jeder konnte sein Wissen deutlich erweitern. Deshalb freue ich mich auch so sehr auf das Zanderbuch welches hoffentlich noch vor dem Wochenende bei mir ist. Liebe Grüße weiter so. dermarc - Rated 5 out of 5
TACKLEFEVER
Das Buch beginnt mit rund 15 Seiten Technik Erläuterung bei der versierte Echolot Nutzer, zu denen ich mich zähle, vielleicht geneigt sind weiter zu blättern weil sie vieles schon wissen und Anfänger weiter blättern möchten weil es zu trocken scheint. Aber etwas Basiswissen gehört einfach dazu. Selbst wenn man als Anfänger bei der Basis Theorie weiter blättern will, sobald es um Chirp geht sollte “jeder” genauer hinschauen 😉 es lohnt sich. Und auch für mich fand ich noch ein zwei kleine Dinge die ich nicht wusste oder noch nicht im Zusammenhang mit anderem sah. Die weiteren Abschnitte (bis Kap. 3) befassen sich mit den verschiedenen Techniken der Geber, Bildschirme, oder dem Smartphone, dem Tablet als Anzeigemedium. Was mir bis dahin sehr positiv auffiel waren die “MERKE-Boxen”, kleine übersichtliche Passagen welche Kerninformationen des zuvor vermittelten Wissen zusammenfassend hervorheben. Auch wenn man nicht alles komplett verstanden hat, hilft diese leicht verständliche Zusammenfassung des voraus gegangenen Inhalts sehr. Kapitel 4 geht auf 2D, Down-Imaging, Side-Scan-Sonar ein, dabei ohne zu konkret auf einen Hersteller abzustellen was ich ebenfalls sehr positiv fand. Dem Angler wird der praktische Einsatz und das Verstehen dessen was man auf dem Echolot sieht erläutert. Fragen wie z.B.: Wo befindet sich der Fisch genau? Was ist eine Fischsichel? Wie setze ich das Echolot beim Vertikalangeln ein? Warum gibt es Vertiefungen obwohl man keine sieht und umgekehrt? Wie erkenne ich die Bodenbeschaffenheit? Fragen zur richtigen Deutung der Unterwasserstruktur, dem optimalen Bildlauf- und Boots- Geschwindigkeit, der Sprungschicht, usw. werden auch beantwortet. Würde ich alles aufzählen würde es hier zu weit führen. Es folgen noch kurze Infos zur Multibeam Technik und ein Kapitel “Die 3D Show mit Garmins Panoptix”. Hier wurde für mich zu wenig Wissen vermittelt, nur auf einen Herstellers gezeigt und nicht auf ähnliche Funktionen oder Techniken anderer Hersteller Bezug genommen. Ich hoffe es kommt in der nächsten Auflage mehr zu dem Thema. Am Ende des Buches kommen Infos rund um konkrete Einstellungen am Echolot. Hier wird einer der wichtigsten Punkte überhaupt behandelt und dies praxisnah und hilfreich. Aller spätestens jetzt lohnt sich das Buch für alle Neueinsteiger. Viel einfacher und kompakter geht es kaum. Ein paar wichtige zuvor besprochene Punkte zu Einstellungen bei bestimmten Echolot Funktionen werden erläutert und mit Checklisten im Kapitel “Die effektivsten Einstellungen beim Echolot auf einen Blick” zusammen gefasst. Hier lohnt es sich für Anfänger die Seiten besonders aufmerksam zu lesen und vielleicht als Kopie mit auf Boot zu nehmen. Damit fällt der Kampf mit den gefühlten tausenden von Einstellungen am Echolot auf dem Wasser leichter. Es klingt fast zu schön um wahr zu sein, aber tatsächlich scheint mir das Buch für Anfänger und Fortgeschrittene Anwender gleichermaßen gut geeignet zu sein. Manchmal suchte ich mehr Hintergrundwissen, weil der im Prinzip sehr gute Ansatz es für Anfänger leicht verständlich zu halten manche Herstellerabhängige Feinheiten außer Acht lässt. Das Buch hat eine gute Gliederung, fasst vieles kompakt zusammen und geht bei wichtigen Punkten auch meist für Fortgeschrittene etwas in die Tiefe. So richtet sich das Buch meiner Meinung nach nicht an wissenschaftliche Anwender, sondern an Echolot Neulinge indem es auch viele Basis Fragen beantwortet ebenso auch an Fortgeschrittene indem es auf diverse Punkte tiefer eingeht. Wenn ich den Sinn des Buches in einem Satz beschreiben sollte, dann wäre dies: Echolottechnik für Anfänger interessant und verständlich erklären und dabei auch ein wenig tieferes Wissen für alle zu vermitteln. Mir ist Stand Juni 2017 kein anderes Buch bekannt das diesen Ansatz so konsequent verfolgt. Ich hoffe ihr habt so viel Spaß beim lesen wie ich. Luke www.tacklefever.de
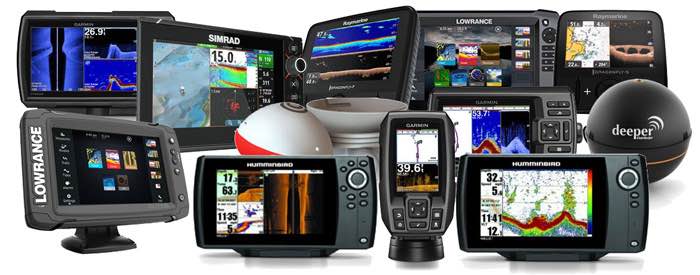
This brings us to the end of this article about how to read a fish finder. If you now understand how a fish sonar works, but are still unsure about which sonar to buy for fishing, you can a have a look at the other fish finder reviews in our extensive fish finder test (including the newest models of all important fish finder manufacturers like Garmin, Lowrance, Humminbird or Raymarine) or write us a short message. Have fun on your next angling trip and “Petri Heil” – Jens and Martin.
Could you take 1 Click to share your experiences?
We will be forever grateful. With your rating we can improve.
average rating 4.5 / 5. Number of ratings: 19
Be the first to rate this post!





Raphaël G
Vladimir M
NICHOLAS JOHN REECY
Henrik
Dr. Manfred Marx
Andreas Witz
AK
Lübbe Wolfgang
Kalksee
Enrico Indelicato
Udo
Josef Weiss
Peter
Holger Just
Matthias Wappler
M. Hermanns
TACKLEFEVER